Sort by Category
- November 2025
- October 2025
- September 2025
- August 2025
- June 2025
- August 2024
- July 2024
- June 2024
- May 2024
- February 2024
- January 2024
- December 2023
- November 2023
- October 2023
- September 2023
- August 2023
- July 2023
- March 2023
- February 2023
- January 2023
- December 2022
- November 2022
- October 2022
- September 2022
- August 2022
- June 2022
- May 2022
- April 2022
- March 2022
- February 2022
- January 2022
- December 2021
- November 2021
- October 2021
- September 2021
- August 2021
- July 2021
- June 2021
- May 2021
- April 2021
- March 2021
- February 2021
- January 2021
- December 2020
- November 2020
- October 2020
- September 2020
- August 2020
- July 2020
- June 2020
- May 2020
- April 2020
- March 2020
- February 2020
- January 2020
- December 2019
- November 2019
- October 2019
- September 2019
- August 2019
- July 2019
- June 2019
- May 2019
- April 2019
- March 2019
- February 2019
- January 2019
- December 2018
- November 2018
- October 2018
- September 2018
- August 2018
- July 2018
- June 2018
- May 2018
- April 2018
- March 2018
- February 2018

Rosemary & Red Wine-Braised Short Ribs
‘Tis the season for comfort food, chaotic schedules, and holiday parties. What better dish to appease all three things than a staple braised short rib recipe, amiright?! That’s why I created a dish that requires one pot, very few ingredients (and most you will have on hand), and high-quality meat that is cooked in less time than most short rib recipes.
In my opinion, braising short ribs is the way to go if you want to develop the best flavor!
Rosemary & Red Wine-Braised Short Ribs - These tender wine-braised short ribs will soon be your go-to for healthy comfort food. Ribs braised in a dutch oven and served over brown butter sage mashed sweet potatoes - can’t beat it!

‘Tis the season for comfort food, chaotic schedules, and holiday parties. What better dish to appease all three things than a staple braised short rib recipe, amiright?! That’s why I created a dish that requires one pot, very few ingredients (and most you will have on hand), and high-quality meat that is cooked in less time than most short rib recipes.


In my opinion, braising short ribs is the way to go if you want to develop the best flavor!
The Art of Braising
SALT - Salt your meat generously on all four sides and let sit overnight or salt at least 30 min to 3 hours in the fridge. The longer the better!
BROWN - Heat a cast-iron skillet on medium-high heat using quality oil. Sear meat on all four sides until you get a nice browning. More space between meat gets it brown(er).
BUILD - Layer ingredients in the pan. I.e. use deglazing liquid from browned meat plus water/stock, add the meat back in, aromatics, and herbs.

I paired these short ribs with my favorite brown butter sage mashed sweet potatoes but you can use any side dish you like!


If you try this recipe, let us know! Leave a comment, rate it, and don’t forget to tag a photo to #fromtherootsblog on Instagram. We love seeing what you come up with!
Rosemary & Red Wine-Braised Short Ribs - These tender wine-braised short ribs will soon be your go-to for healthy comfort food. Ribs braised in a dutch oven and served over brown butter sage mashed sweet potatoes - can’t beat it!
Ingredients
3.5 lbs bone-in short ribs (use 3 lbs if using boneless beef short ribs)
1 can (28 oz) fire-roasted diced tomatoes
1 large white onion (sliced)
4 cloves garlic (minced)
2 cups organic low-sodium beef broth
2 cups red wine (cabernet sauvignon)
2 Tbsp Extra Virgin Olive Oil
1 Tbsp balsamic vinegar
1 Tbsp low-sodium Worcestershire sauce
1 Tbsp light brown sugar
4-6 fresh rosemary sprigs
S&P to season to taste
Directions
Generously season your meat on all four sides with salt and pepper and let sit overnight or for at least 30 minutes to 3 hours in the fridge. The longer the better.
Heat oil in dutch oven or cast-iron skillet over medium-high heat.
Add short ribs to hot oil and sear for 3-4 minutes per side until browned. Try not to move the short ribs once you put them down and make sure they have space between the meat.
Remove the short ribs from dutch oven/skillet and set aside. They won't be fully cooked yet, and that’s okay!
Return dutch oven to stovetop and lower temperature to medium heat. Add sliced onions and minced garlic. If the pan looks too dry, add another splash of olive oil. Saute until onion is translucent, about 2-3 minutes.
Add the broth and wine to deglaze the dutch oven. Make sure to scrape down any browned bits off the bottom of the pan with a wooden spoon.
Add the rest of the ingredients (tomatoes, balsamic vinegar, sauce, brown sugar, rosemary sprigs, and S&P) along with the short ribs and mix until combined. Once the mixture is boiling, bring the heat down to low medium and cover the dutch oven with a tight-fitting lid.
Cook on stovetop for 2 hours - 2 hours and 30 minutes or until short ribs easily pull apart with tongs/ fork or the meat is falling off the bone.
Serve short ribs with reserved leftover broth over mashed potatoes or over brown butter sage mashed sweet potatoes.
Garnish with fresh rosemary and pomegranate arils for a festive look!
Notes
No dutch oven? That’s okay! The crockpot will do the trick. Just simply brown short ribs in a skillet and then transfer all ingredients along with short ribs in crockpot and cook on low for 7-8 hours.
If you do not wish to use wine or have it on hand, you can sub out the 2 cups of wine with more beef broth or use cranberry/cherry juice! The flavors will be different but still very tasty.

Creamy Tomato Pesto Soup
During the colder months, my mother would make homemade creamy tomato soup with grilled cheese. I’m not much of a soup person, but it was MY FAVORITE! Ever since then, I still drool dream about it to this day! What takes her soup above the rest is love (obviously), fresh herbs, and heavy cream. Well since heavy cream is a no go for this gut, I made a few changes to the recipe.
It’s a very simple recipe, actually. If you are crunched for time and need to have soup asap, (because don’t we all?) then you will only need five ingredients to make this soup. But, if you really want to make your mom’s old recipe jealous, whip up a quick pesto drizzle as a garnish. Dipping your dairy-free/gluten-free grilled cheese in that winning combination will not disappoint your taste buds, trust me.
Creamy Tomato Basil Soup - The creamiest, richest soup you have ever had that’s dairy-free!

During the colder months, my mother would make homemade creamy tomato soup with grilled cheese. I’m not much of a soup person, but it was MY FAVORITE! Ever since then, I still drool dream about it to this day! What takes her soup above the rest is love (obviously), fresh herbs, and heavy cream. Well since heavy cream is a no go for this gut, I made a few changes to the recipe.

It’s a very simple recipe, actually. If you are crunched for time and need to have soup asap, (because, don’t we all?) then you will only need five ingredients to make this soup. But, if you really want to make your mom’s old recipe jealous, whip up a quick pesto drizzle as a garnish. Dipping your dairy-free/gluten-free grilled cheese in that winning combination will not disappoint your taste buds, trust me.

For this recipe, if you are wanting a smooth, “bisque” texture, I would recommend getting a blender or immersion blender. Now, onto the recipe!

If you try this recipe, let us know! Leave a comment, rate it, and don’t forget to tag a photo to #fromtherootsblog on Instagram. We love seeing what you come up with!
Creamy Tomato Basil Soup - The creamiest, richest soup you have ever had that’s dairy-free!
Makes 4-6 servings
Ingredients:
1 white onion (sliced)
4 cloves garlic (smashed)
1 Tbsp grass fed butter (or ghee, coconut oil)
5-8 sprigs fresh oregano (strip leaves from the stem)
1 can (28 oz) fire roasted organic crushed tomatoes
1 can lite coconut milk unsweetened
Pesto drizzle
1 bunch (.75 oz package) fresh basil
¼ cup oil
4 cloves garlic
1 Tbsp feta (or DF cheese)
Directions:
In a large skillet, melt butter over medium heat. Add onions and garlic and saute until translucent. Add can of tomatoes, oregano, and season with salt and pepper. Bring to a boil, reduce heat and simmer uncovered for about 10 minutes or until slightly thickened.
To make the pesto drizzle, add basil, garlic, and feta to a processor. While the processor is on low, pour the oil through the feed tube gradually. Scrape down the sides and add more oil if necessary. Season to taste with salt and pepper and transfer to a small bowl. If you do not have a processor, finely chop ingredients and combine in a small bowl.
Transfer tomato mixture to a blender and process until smooth (remember, mixture is hot!). Alternatively, use an immersion blender, process until smooth.
With soup over low heat, add coconut milk. Season to taste with sea salt, pepper, and optional red pepper flakes.
When ready to serve, drizzle pesto and/or additional coconut milk and serve!
Notes:
I love using this brand for organic canned tomatoes.


Baked Hot Chicken
Living so close to Nashville, it’s imperative that you get Nashville hot chicken; it’s a cardinal sin if you don’t! As I’m getting older, my body takes a little longer to recover from all the grease and gluten. I mean, YOLO when you can but sometimes it takes a toll on your body!
What’s my solution? I created a healthier twist on the beloved hot chicken. I use coconut oil to decrease the amount of grease. I also chose to bake the chicken. That way, I’m only dying to get seconds and thirds instead of just dying from the grease! So, let’s talk about this chicken!
A healthier twist on the classic Nashville hot chicken. Baked, gluten-free, dairy-free, and full of spicy flavors!

Living so close to Nashville, it’s imperative that you get Nashville hot chicken; it’s a cardinal sin if you don’t! As I’m getting older, my body takes a little longer to recover from all the grease and gluten. I mean, YOLO when you can but sometimes it takes a toll on your body!
What’s my solution? I created a healthier twist on the beloved hot chicken. I use coconut oil to decrease the amount of grease. I also chose to bake the chicken. That way, I’m only dying to get seconds and thirds instead of just dying from the grease! So, let’s talk about this chicken!

The trick to getting chicken moist and flavorful is all in the marinade. Typically, buttermilk is used in creating a moist chicken (sorry for using moist three times!). However, I used almond milk to keep this recipe dairy-free. The trick here is to add lemon juice or apple cider vinegar to the plant-based milk of your choice. The acidity helps to thicken and basically curdle the almond milk. You won’t even notice a lack of buttermilk, and when you add it all with pickle juice and lots of seasonings, you get an awesome Nashville hot chicken!
The breading is simple using a gluten-free baking flour. Lightly coat/spray the chicken with coconut or avocado oil to crisp the outer coat. Chicken thighs are best with this recipe as the skin releases mouthwatering juices into the meat underneath as it cooks. The skin also protects the meat from direct heat, which helps the thighs to cook gently and to retain its moisture.

A complexity of sweet and spicy flavors are incorporated into the hot chicken. What really takes the chicken over the top is using honey infused with chili peppers. I love using this brand as you can find it in most grocery stores!
If you try this recipe, let us know! Leave a comment, rate it, and don’t forget to tag a photo to #fromtherootsblog on Instagram. We love seeing what you come up with!
Ingredients
2 lbs chicken thighs
3 Tbsp pickle juice
1 cup GF baking flour
Hot sauce (optional)
Coconut oil or avocado oil
Buttermilk mixture
1 cup unsweetened plant based milk (almond)
1 Tbsp ACV or fresh lemon
Seasonings
1 Tbsp cayenne
1 Tbsp smoked paprika
1 tsp garlic powder
1 tsp onion powder
1 tsp salt
1 tsp creole seasoning
1 tsp sugar
½ tsp black pepper
Dashes of red pepper flakes
Directions
To make the “buttermilk”, add vinegar to the milk and sit for 10 minutes or until milk mixture is curdled/activated.
Whisk all seasonings together in a small bowl. Remove ¾ of seasoning mixture and coat the chicken thighs inside a Ziploc bag. Add the “buttermilk” mixture along with pickle juice and a couple dashes of hot sauce (optional). Toss to coat and refrigerate for 2 hours or up to overnight.
When ready to cook, preheat oven to 425 degrees.
Prepare the flour mixture by whisking ¼ of seasoning mixture to 1 cup GF baking flour.
Working with one piece of chicken at a time, dredge chicken into flour mixture both sides and place chicken on a baking rack. Repeat until all chicken is coated.
Spray or brush tops of chicken with melted coconut oil or avocado oil.
Bake chicken for 20-25 minutes. Take chicken out and coat tops with hot sauce (optional). Flip the chicken and spray or brush bottom of chicken with oil until coated.
Place back in the oven and bake for an additional 15-20 minutes or until chicken reaches and internal temperature of 165 degrees.
Let chicken cool for 5 minutes and then drizzle honey with infused chili peppers (optional but so worth it!)

Turkey Taco Spaghetti Squash Boats
When I think of spaghetti squash, I think spaghetti = Italian, right? So, that is pretty much all I have done when cooking spaghetti squash. I have made shrimp alfredo, chicken parmesan, and the classic marinara to name a few, but it never occurred to me to use spaghetti squash in a different way. After posting a poll on my IG, it turns out many of you would like to see how spaghetti squash can be used for a Mexican inspired dish!
Turkey taco spaghetti squash boats is a great recipe to make for a guilt-free, low carb taco night. Perfect for meal preps and a hit among kids!

When I think of spaghetti squash, I think spaghetti = Italian, right? So, that is pretty much all I have done when cooking spaghetti squash. I have made shrimp alfredo, chicken parmesan, and the classic marinara to name a few, but it never occurred to me to use spaghetti squash in a different way. After posting a poll on my IG, it turns out many of you would like to see how spaghetti squash can be used for a Mexican inspired dish!

Needless to say, after experimenting I was surprised at how spaghetti squash and Mexican flavors paired so well together! My husband was hesitant at first but it was love at first bite for him -- he now asks for these squash boats every week!

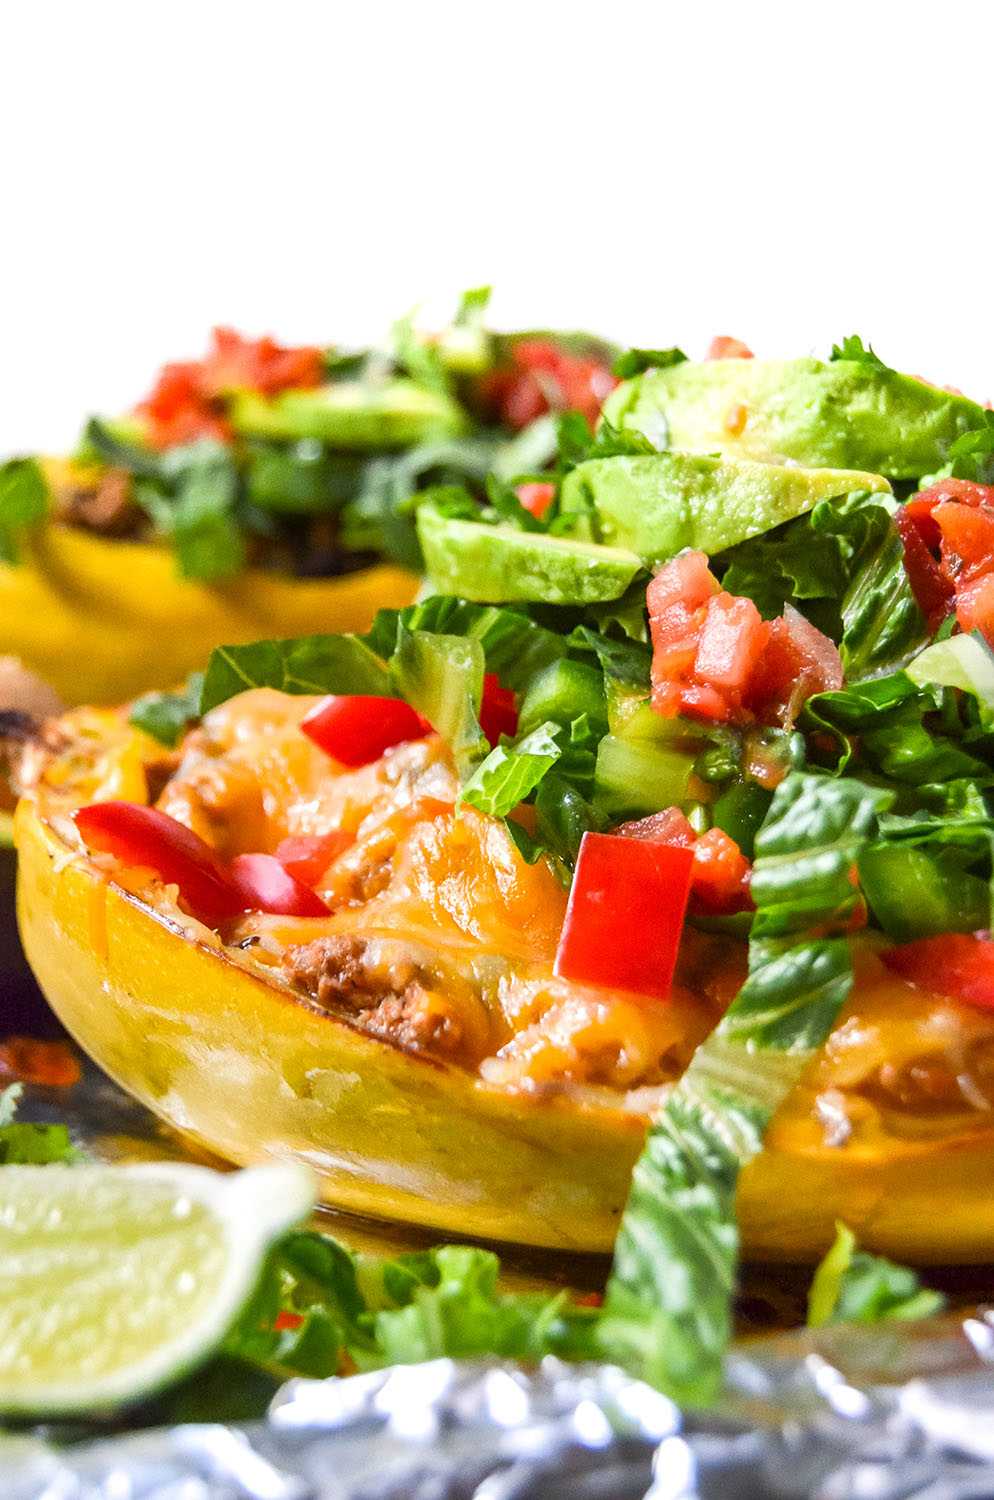
Hey, if I can make this every week then I would be happy as a clam. For a #tacotuesdaynight, it has to be the easiest recipe to bake while preparing the toppings. While your spaghetti squash is cooking, you are preparing the meat mixture that goes inside the boats while prepping all the fun and healthy toppings. As soon as your boats are done baking, add all your favorite toppings and dig in! And the best thing when you’re done eating? You don’t have as many dishes to wash!!

You can make this recipe kid-friendly by omitting/using less of the spicier seasonings. Other than that, these squash boats would be great to add to your taco night! With that said, you will find that this recipe can be customized to your preference. For example, in my hubby’s boat, I added extra beans and cheese while my boat sticks to the recipe but with 5 maybe 20 dashes of hot sauce (love my spicy food)!

If you try this recipe, let us know! Leave a comment, rate it, and don’t forget to tag a photo to #fromtherootsblog on Instagram. We love seeing what you come up with!
Turkey taco spaghetti squash boats is a great recipe to make for a guilt-free, low carb taco night. Perfect for meal preps and a hit among kids!
INGREDIENTS
1 lb lean ground turkey
3 cloves garlic
2 cans low-sodium black beans ((drained/rinsed))
1 large spaghetti squash
1 cup fresh salsa or pico de gallo*
1 tsp each garlic powder, ground cumin, and chili powder
1/2 tsp each smoked paprika, cayenne pepper, and salt
1/4 tsp pepper
couple dashes of red pepper flakes
Toppings
Lime wedges, fresh salsa, pico de gallo*, romaine lettuce, cheese, avocado, cilantro, jalapenos, peppers, hot sauce
DIRECTIONS
Preheat oven to 375 degrees. Slice squash in half lengthwise and scoop out the seeds.
Drizzle halves with olive oil and season with S&P. Place squash cut side down on baking sheet and roast for 45-50 minutes. When done, use a fork to scrape out the squash flesh.
While your spaghetti squash is cooking, make the meat mixture.
Drizzle oil in a skillet on medium-high heat. Add the minced garlic to the skillet and saute for about 2 minutes or until fragrant. Add the ground turkey and cook until slightly pink, then add all of your seasonings, fresh salsa, and black beans.
Turn the heat off and set meat mixture to the side.
Transfer cooked squash flesh to the meat mixture and combine. At this point, taste mixture to see if you need to add more S&P/seasonings/hot sauce for personal preference.
Transfer squash mixture to your now scraped spaghetti squash bowls and top with optional cheese.
Bump up the oven temperature to 400 degrees and bake for an additional 5-10 minutes until your cheese is nice and bubbly or your naked boat is nice and warm.
Top with your favorite toppings and enjoy!
NOTES
Pro tip: Place the whole squash in the microwave for 5 minutes for an easier slice!
If you are using a smaller spaghetti squash, then use just 1 can black beans.

Grilled Shrimp Summer Salad
The grill is my kitchen during the spring and summer seasons. Grilling is a straightforward process -- it’s easy and quick. Plus who wouldn’t want to be outside with sun rays and the amazing aroma of grilled food in the air?
Grilled shrimp summer salad is loaded with protein, antioxidants and summer produce that will quickly become a summer meal staple!

The grill is my kitchen during the spring and summer seasons. Grilling is a straightforward process -- it’s easy and quick. Plus who wouldn’t want to be outside with sun rays and the amazing aroma of grilled food in the air?

That’s why this grilled shrimp summer salad has been playing on repeat all summer long! When my husband and I come home after our evening workout, we usually just want to eat something light yet nutrient dense to replenish our bodies, but we don’t want to be slaving away in the kitchen while we are starving! A salad is a perfect solution to this dilemma.

What’s great about salads is that they are versatile so even if you do not have all the ingredients or the produce is no longer in season, you can add whatever you like.
Aside from the grilled shrimp, this recipe has three components: pineapple salsa, blueberries, and basil vinaigrette. So, for example, if pineapples are not in season, use another fruit like peaches or oranges. Have fun with the ingredients and customize this salad to YOUR preference!

Another great thing about salads is that if you make everything in bulk then it just takes minutes to prepare a salad each night. Just put everything in containers and add/take away things to your salad depending on what mood you are in!

If you try this recipe, let us know! Leave a comment, rate it, and don’t forget to tag a photo to #fromtherootsblog on Instagram. We love seeing what you come up with!
Grilled shrimp summer salad is loaded with protein, antioxidants and summer produce that will quickly become a summer meal staple!
INGREDIENTS
Grilled Shrimp Marinade
12 oz large raw shrimp (peeled and deveined)
1/2 tsp cayenne
1/2 tsp onion powder
1/2 tsp smoked paprika
1/2 tsp chili powder
1/2 tsp salt
1/4 tsp cumin
2 dashes red pepper flakes
Juice and zest of 1 lemon
2 Tbsp EVOO
Pineapple Salsa
1 cup fresh pineapple
1 jalapeno
1 small bunch cilantro
1 large red tomato
1/2 red onion
Juice of 1/2 lime
S&P to taste
Blueberry and Basil Vinaigrette
3/4 cup fresh blueberries
4-8 basil leaves (depending on preference)
1/2 lemon
1 tsp dried minced onion
1-2 tsp honey
1 tsp apple cider vinegar
1/4 cup EVOO
S&P to taste
Grilled Shrimp Marinade
Combine shrimp, seasonings, lemon, and oil to a Ziploc bag-making sure the shrimp is fully covered. Refrigerate for at least 30 minutes. Meanwhile, soak 6-10 small skewers in water.
From the shrimp from the fridge and thread 6-8 shrimp on each damp skewer.
Very lightly brush a cast iron griddle or grill grate with oil. Heat the grill to medium. Grill the shrimp for 5-7 minutes, turning over once halfway through.
Place the shrimp skewers on a plate to cool. Sprinkle additional red pepper flakes if you like!
Pineapple Salsa
Finely dice all ingredients and in a bowl, combine all ingredients. Store in fridge until ready to use.
Blueberry and Basil Vinaigrette
Put all ingredients in a blender or food processor and blend until smooth and creamy. Add additional oil or water if the mixture is too thick.
* Due to the natural pectin found in the blueberries, this dressing will quickly begin to gel. Use immediately or blend in additional liquid to make it pourable.
Directions:
Prepare your salad by adding greens, alfalfa sprouts, grilled shrimp skewers, pineapple salsa, vinaigrette and your favorite toppings! Enjoy!