Sort by Category
- August 2024
- July 2024
- June 2024
- May 2024
- February 2024
- January 2024
- December 2023
- November 2023
- October 2023
- September 2023
- August 2023
- July 2023
- March 2023
- February 2023
- January 2023
- December 2022
- November 2022
- October 2022
- September 2022
- August 2022
- June 2022
- May 2022
- April 2022
- March 2022
- February 2022
- January 2022
- December 2021
- November 2021
- October 2021
- September 2021
- August 2021
- July 2021
- June 2021
- May 2021
- April 2021
- March 2021
- February 2021
- January 2021
- December 2020
- November 2020
- October 2020
- September 2020
- August 2020
- July 2020
- June 2020
- May 2020
- April 2020
- March 2020
- February 2020
- January 2020
- December 2019
- November 2019
- October 2019
- September 2019
- August 2019
- July 2019
- June 2019
- May 2019
- April 2019
- March 2019
- February 2019
- January 2019
- December 2018
- November 2018
- October 2018
- September 2018
- August 2018
- July 2018
- June 2018
- May 2018
- April 2018
- March 2018
- February 2018

Fudgy Paleo Brownies
Growing up, brownies were my least favorite dessert. Maybe because the flavors were too rich or the texture was too dry, but nonetheless, I stopped eating them. Of course I would get the judgy looks and sneers but hey, they didn’t taste good to me! That is, until I had a fudgy vegan brownie at this bakery in Atlanta and I was floored! It was like the heavens opened up with arms wide open and sucked me in!
Foolproof staple brownie recipe that is also gluten-free, dairy-free, and nut-free!

Growing up, brownies were my least favorite dessert. Maybe because the flavors were too rich or the texture was too dry, but nonetheless, I stopped eating them. Of course I would get the judgy looks and sneers but hey, they didn’t taste good to me! That is, until I had a fudgy vegan brownie at this bakery in Atlanta and I was floored! It was like the heavens opened up with arms wide open and sucked me in!

Too much? Well, that’s how I feel about these brownies! Now, this recipe didn’t happen overnight (perfection doesn’t happen overnight). As a food blogger, sometimes recipes can be made simple and it just clicks. Other times, not so much.
This recipe did not instantly click. It started out as a Mexican hot chocolate cookie that had the batter of a brownie but baked similar to a cake and ultimately dried out after a day or two. But the flavor was there and that’s where I went. Long story short, here we are and I am so glad!
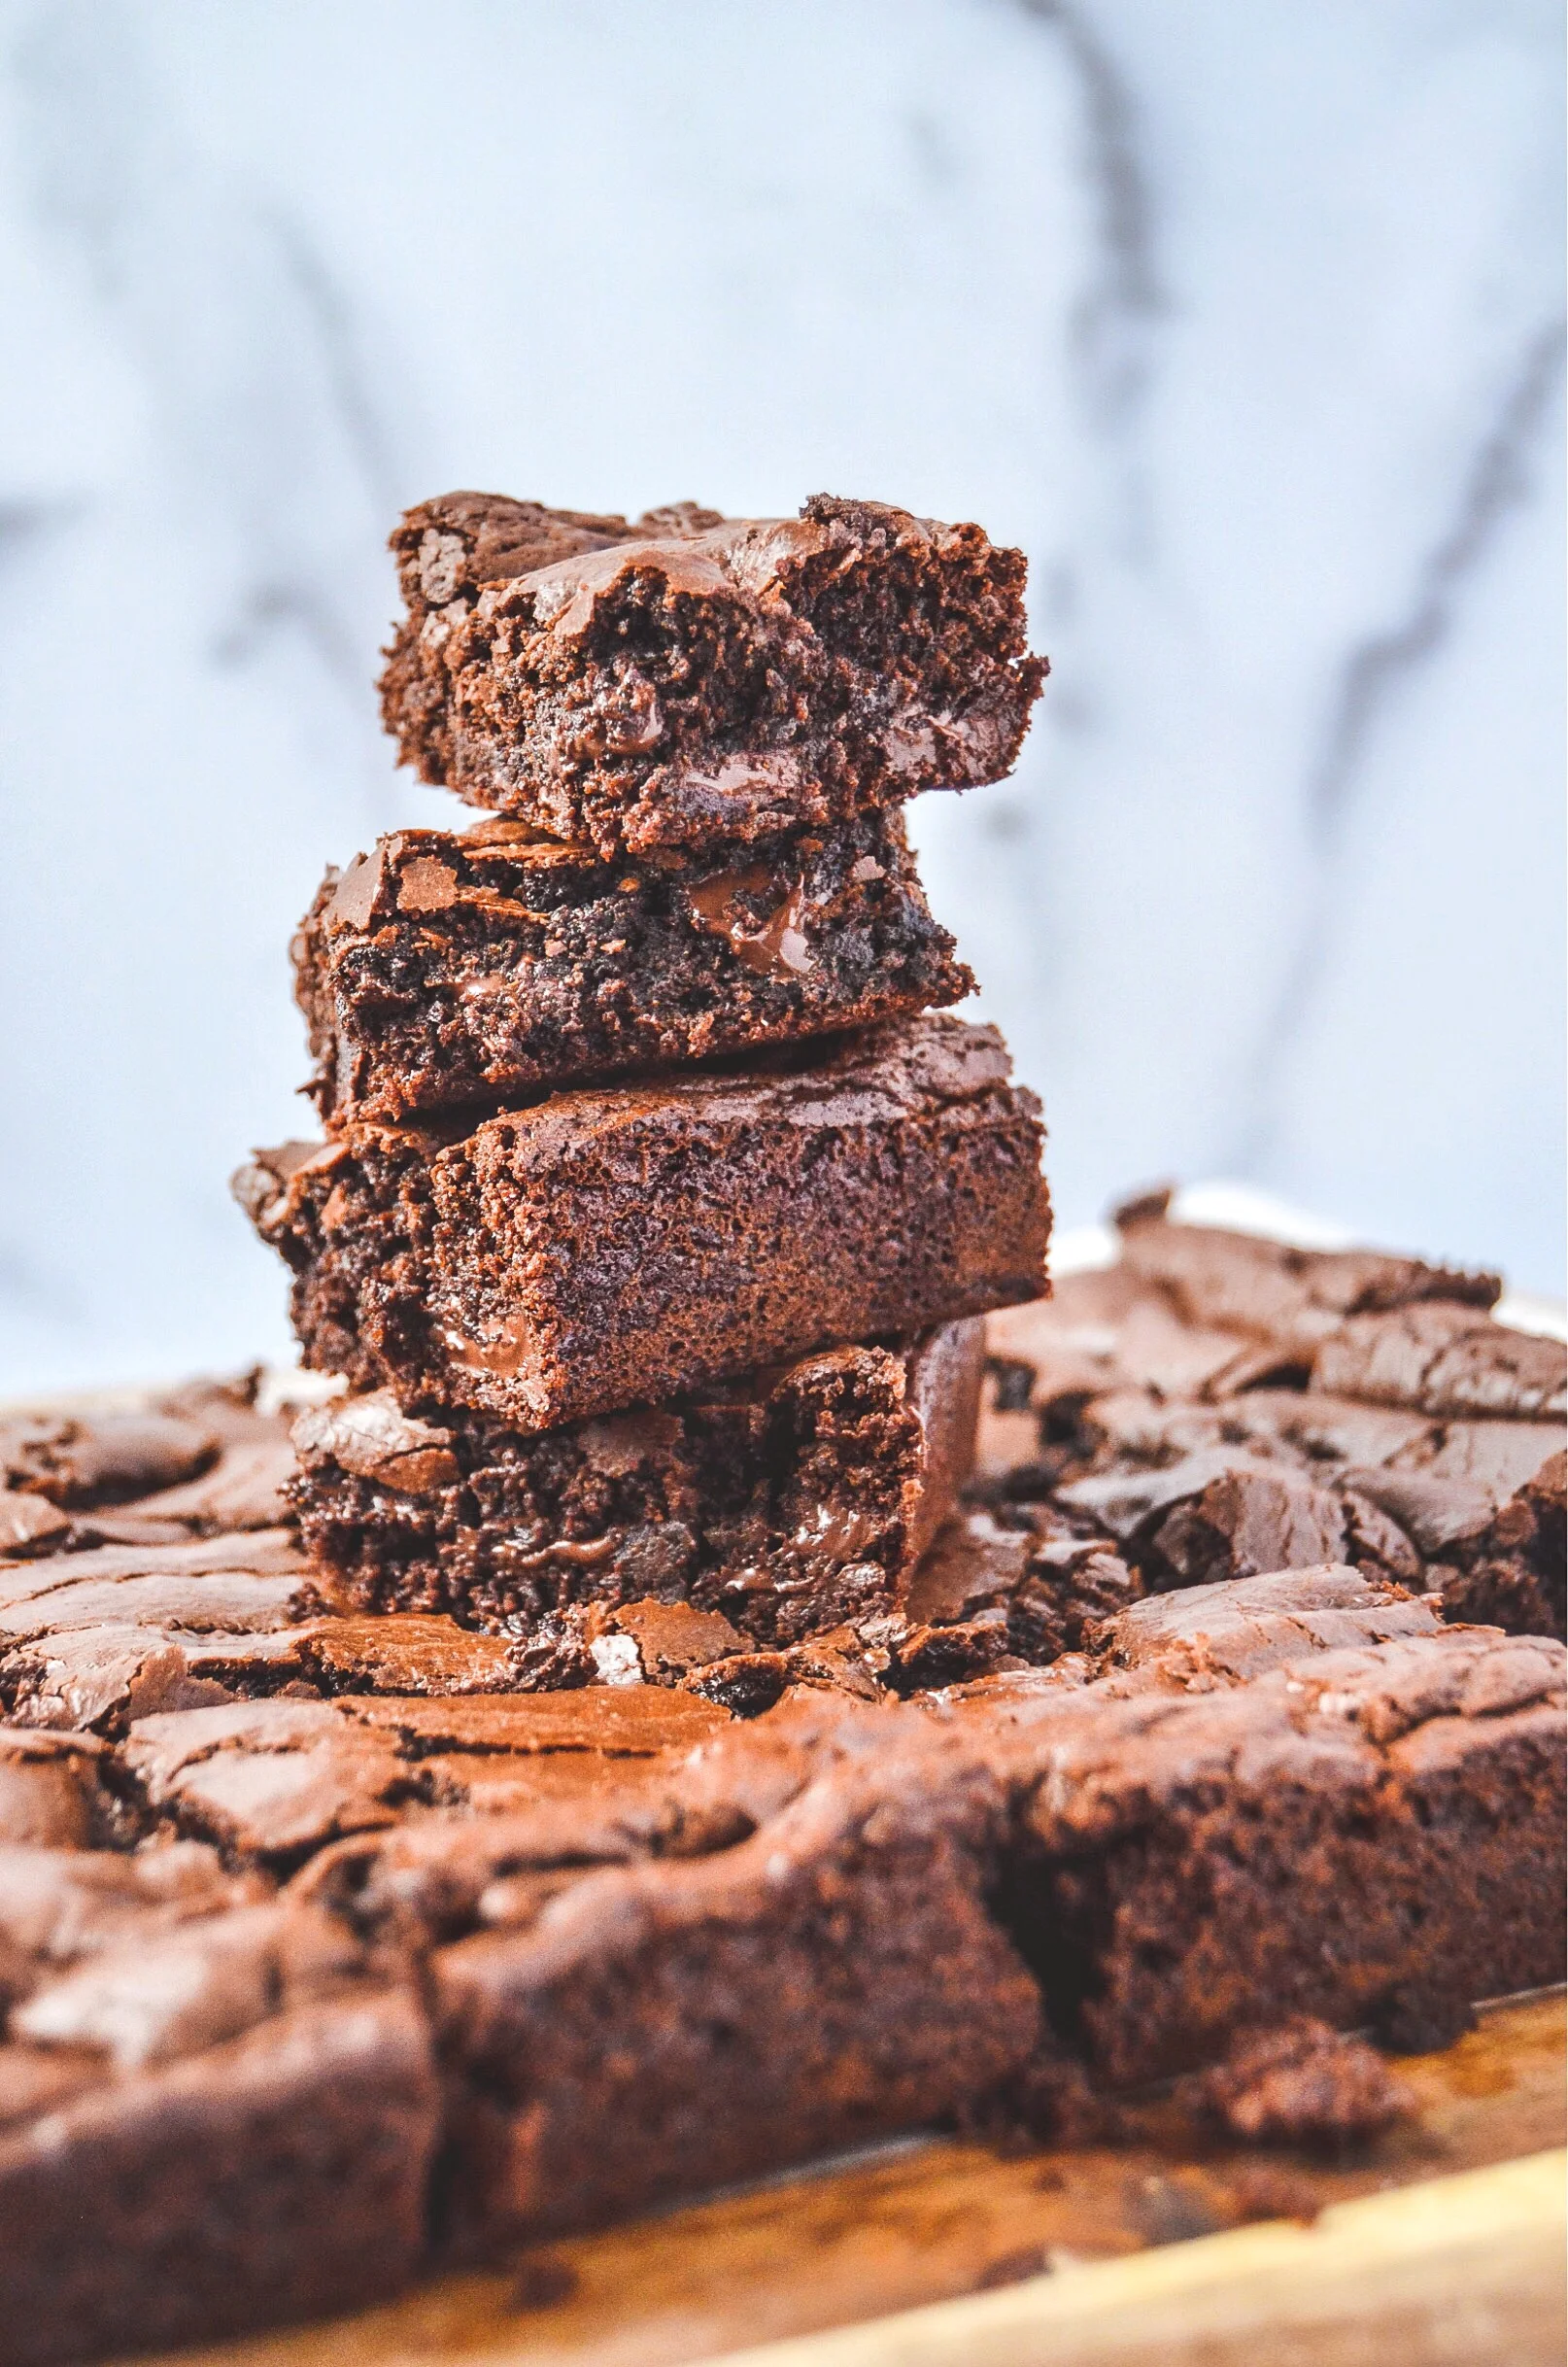
Adding a healthy twist to an old fashioned brownie can be cumbersome at times. Luckily, this brownie is free of everything “bad” yet it tastes just like your typical sugar-filled brownie. This way, we can still ride that amazing “sugar high” but not feel so bad.

How do we get there? Well, we adapt and understand the ingredients that we are using. For example, coconut flour is used to replace all-purpose white flour. Coconut flour absorbs liquid so we only use ¼ cup. Baking powder is a great leavening agent but since this is a paleo recipe, we use coconut sugar, eggs, and vanilla extract instead. This combination gets whipped until a “ribbon stage” is reached.

If you try this recipe, let us know! Leave a comment, rate it, and don’t forget to tag a photo to #fromtherootsblog on Instagram. We love seeing what you come up with!
Ingredients
2/3 cup coconut sugar
2 eggs
1 tsp vanilla extract
8 oz dark chocolate chunks
1/4 cup coconut oil
1/4 cup coconut flour
1/4 cup cocoa powder
1/2 tsp salt
1/2 tsp baking soda
1/2 cup dark chocolate chunk
instructions
Preheat oven to 350 degrees and line a 9x9 baking pan with parchment paper. Spray with a non-stick spray and set aside.
In a small saucepan or small bowl, melt 8 oz dark chocolate and oil in 30-second increments if using the microwave or low heat on stove top until smooth and glossy. Remove from heat and set aside to cool slightly.
Using a hand mixer or KitchenAid mixer, combine coconut sugar, eggs, and vanilla extract and whisk together until the mixture reaches the “ribbon stage” (when you lift the whisk, the mixture should stream down evenly in “ribbons”).
In a medium bowl, whisk dry ingredients (coconut flour, cocoa powder, salt, and baking soda)
With the mixer/hand mixer on low, add the melted chocolate and dry ingredients until fully combined. Fold in ½ cup dark chocolate chunks.
Pour batter into prepared pan and smooth the surface.
Bake for 17-20 minutes until edges are set and the inside is slightly underdone.
Let the brownies rest in the pan for 15-20 minutes. This is the hardest part but so worth it!
Store in fridge for up to a week or freezer for up to a month. I personally like making these to freeze so that I can have brownie bites for my ice cream!

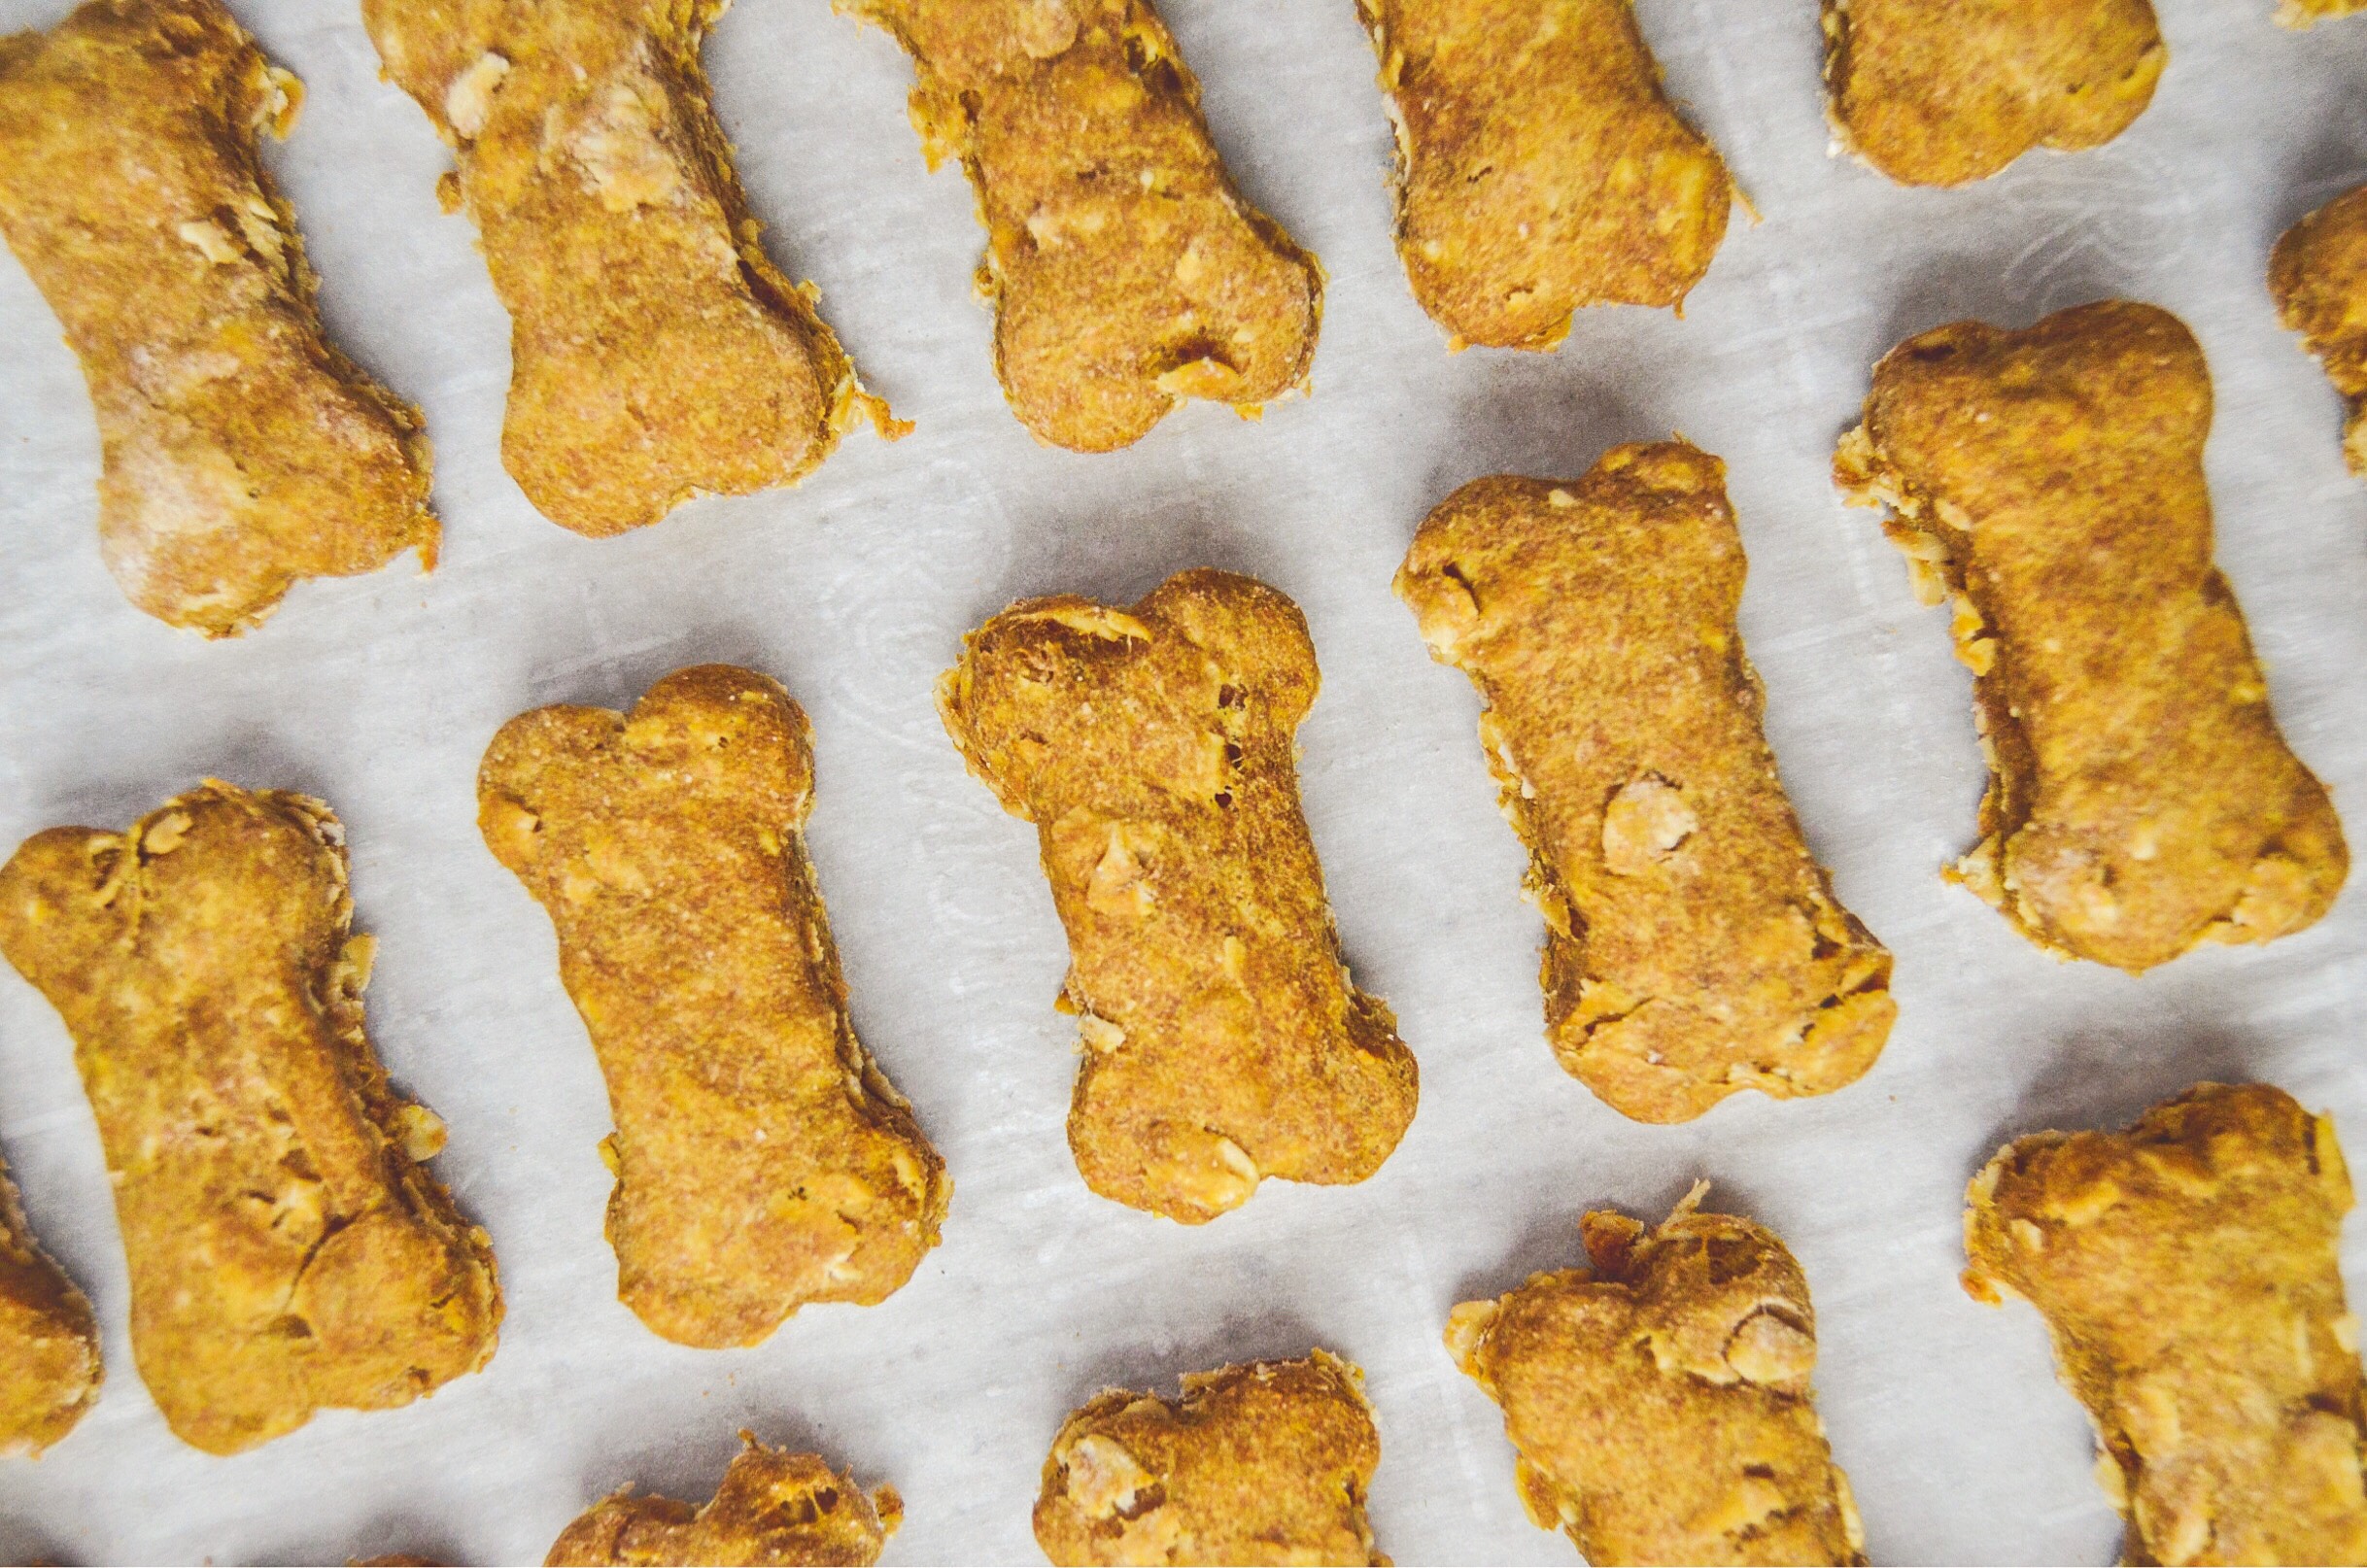
Healthy Dog Biscuits
You are probably thinking to yourself, “This girl would be the type that makes food for her dogs!” Haha, well, in this case, yes. However, in general -- no! Who has time for that!? This recipe actually happened out of boredom during one of Kentucky’s finest winter storms. I was trying to occupy the kids (my dogs Rory and Emmy) as they were getting cabin fever so I looked in the pantry and this is the result!
These healthy dog biscuits are super easy to make and completely safe for your fur babies. The good news is that you probably already have some of the ingredients such as flour, oats, baking soda, and peanut butter.
Easy homemade treats for your furry loved ones, complete with a carob and peanut butter glaze!

You are probably thinking to yourself, “This girl would be the type that makes food for her dogs!” Haha, well, in this case, yes. However, in general -- no! Who has time for that!? This recipe actually happened out of boredom during one of Kentucky’s finest winter storms. I was trying to occupy the kids (my dogs Rory and Emmy) as they were getting cabin fever so I looked in the pantry and this is the result!

These healthy dog biscuits are super easy to make and completely safe for your fur babies. The good news is that you probably already have some of the ingredients such as flour, oats, baking soda, and peanut butter.
The key ingredients for these dog biscuits are natural peanut butter, coconut oil, and pumpkin. Most people know that peanut butter is a great protein source and coconut oil has healthy fats that give dogs that shiny coat, but pumpkin is great to soothe their digestive system as it contains a high amount of fiber.

Every time I have chocolate my dogs go crazy. Of course I’ve never given them chocolate before but I guess they smell the sweet flavors and want it. Because of that, I made a glaze using carob powder with the peanut butter. Carob powder is a great alternative to cocoa powder. For dogs, this is 100% safe! Carob powder is naturally sweetened as well.


As you can see, the dogs love these biscuits and I think a lot of that has to do with that drizzle!
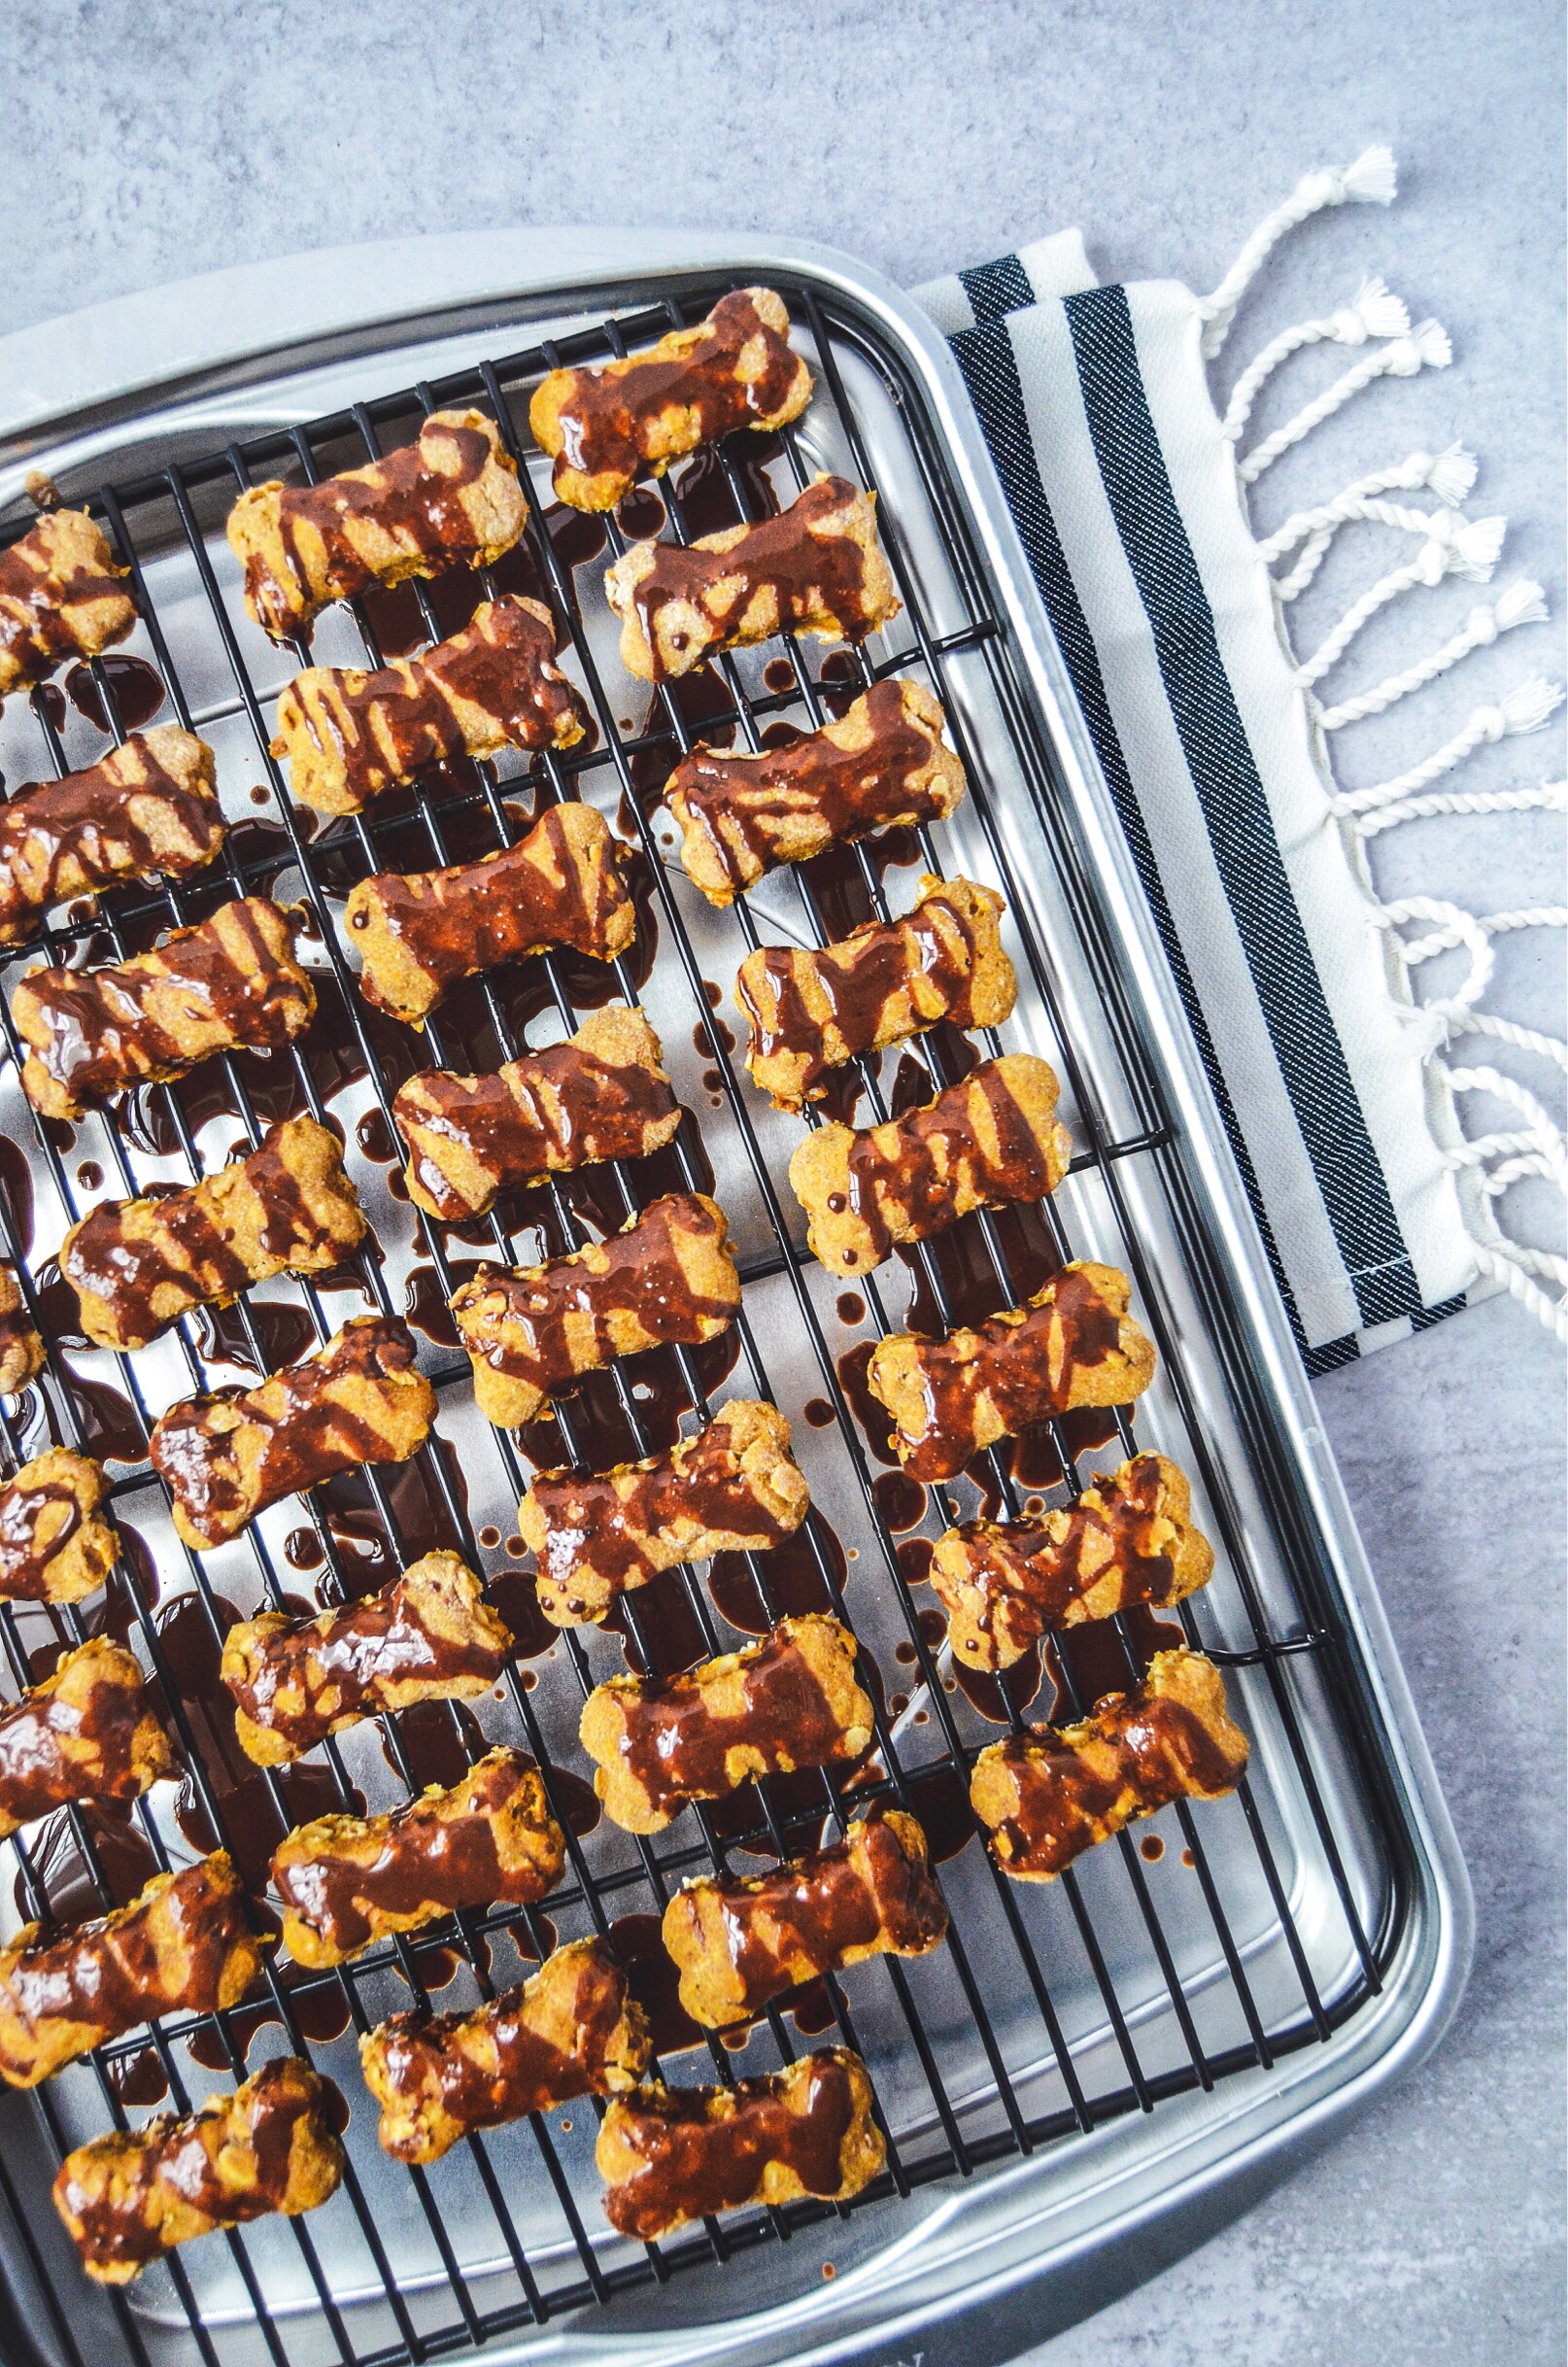
Coconut oil is used in the drizzle so keeping your biscuits out at room temperature will melt the drizzle so it is best to store in the fridge or freezer. Personally, the dogs love frozen treats because it takes them longer to chew so I just store in the freezer. Once you make these treats, you will be set for a long time as this recipe makes around 70 biscuits. These are also great as gifts so spread the love!
If you try this recipe, let us know! Leave a comment, rate it, and don’t forget to tag a photo to #fromtherootsblog on Instagram. We love seeing what you come up with!
Ingredients
1 ¼ cup old fashioned oats
1 ½ cups whole wheat flour
1 cup 100% pure pumpkin (canned)
½ cup peanut butter
2 eggs
¼ cup coconut oil (melted)
1 tsp baking soda
Carob and peanut butter glaze
2 Tbsp carob powder
2 Tbsp coconut oil (melted)
¼ cup peanut butter
Directions
Preheat oven to 350 degrees.
In a large bowl, mix the dry ingredients together: oats, flour, and baking soda.
To a small bowl, mix the wet ingredients together: pumpkin, peanut butter, eggs, and coconut oil.
Incorporate the wet ingredients to the dry ingredients and mix together until it forms a ball. If the mixture is wet, add flour or oats gradually. Knead dough until the flour is incorporated.
Sprinkle whole wheat flour to a flat surface and roll out dough mixture using a rolling pin.
Use a cookie cutter to cut out small dog bone shapes or just bake into little circles like cookies.
Bake for 12-15 min on a parchment lined baking sheet.
As the biscuits cook, whisk together the glaze ingredients until smooth.
After the biscuits have cooled for at least 5 minutes, drizzle glaze over the biscuits and place in the fridge for the glaze to harden.
Best stored in the fridge or freezer.
Notes
Makes 65-70 small dog biscuits
Since these are homemade dog biscuits, it would be best to store in the fridge or freezer. They may mold if left out at room temperature for over a week.
All ingredients used for this recipe are considered safe for dogs, but it’s always a good idea to make sure there are no dog allergies/sensitivities to any of the ingredients.
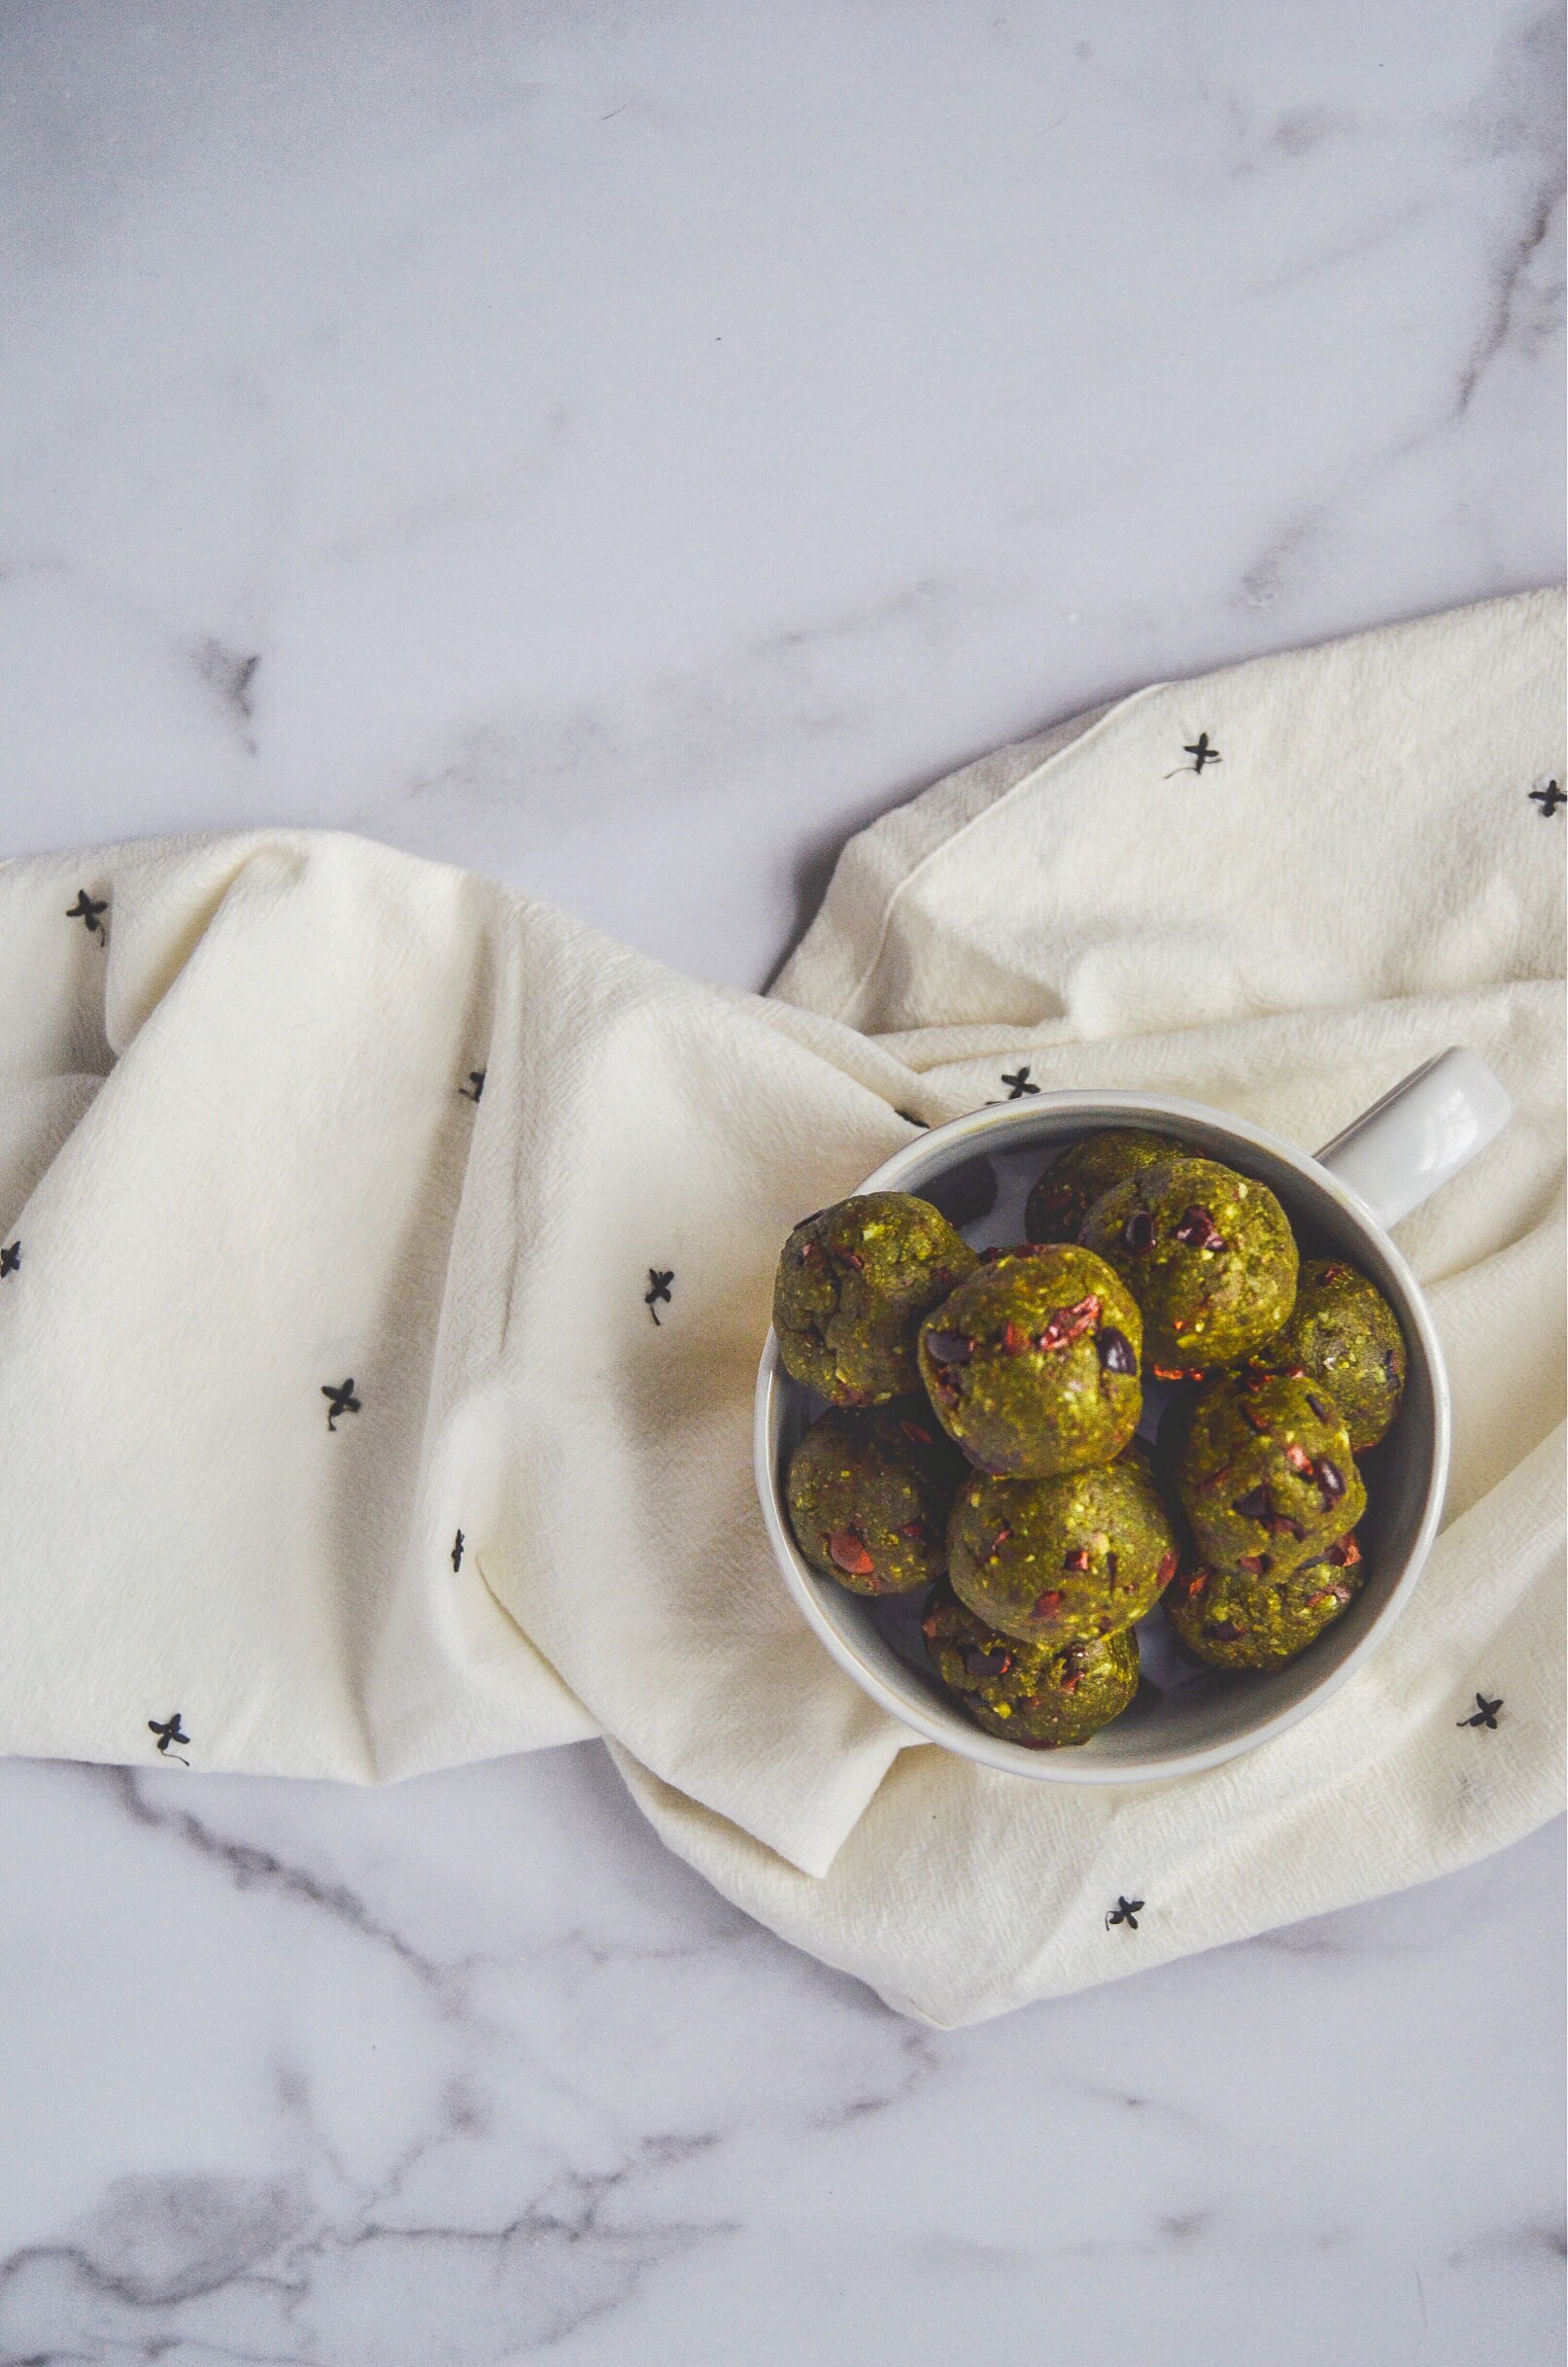
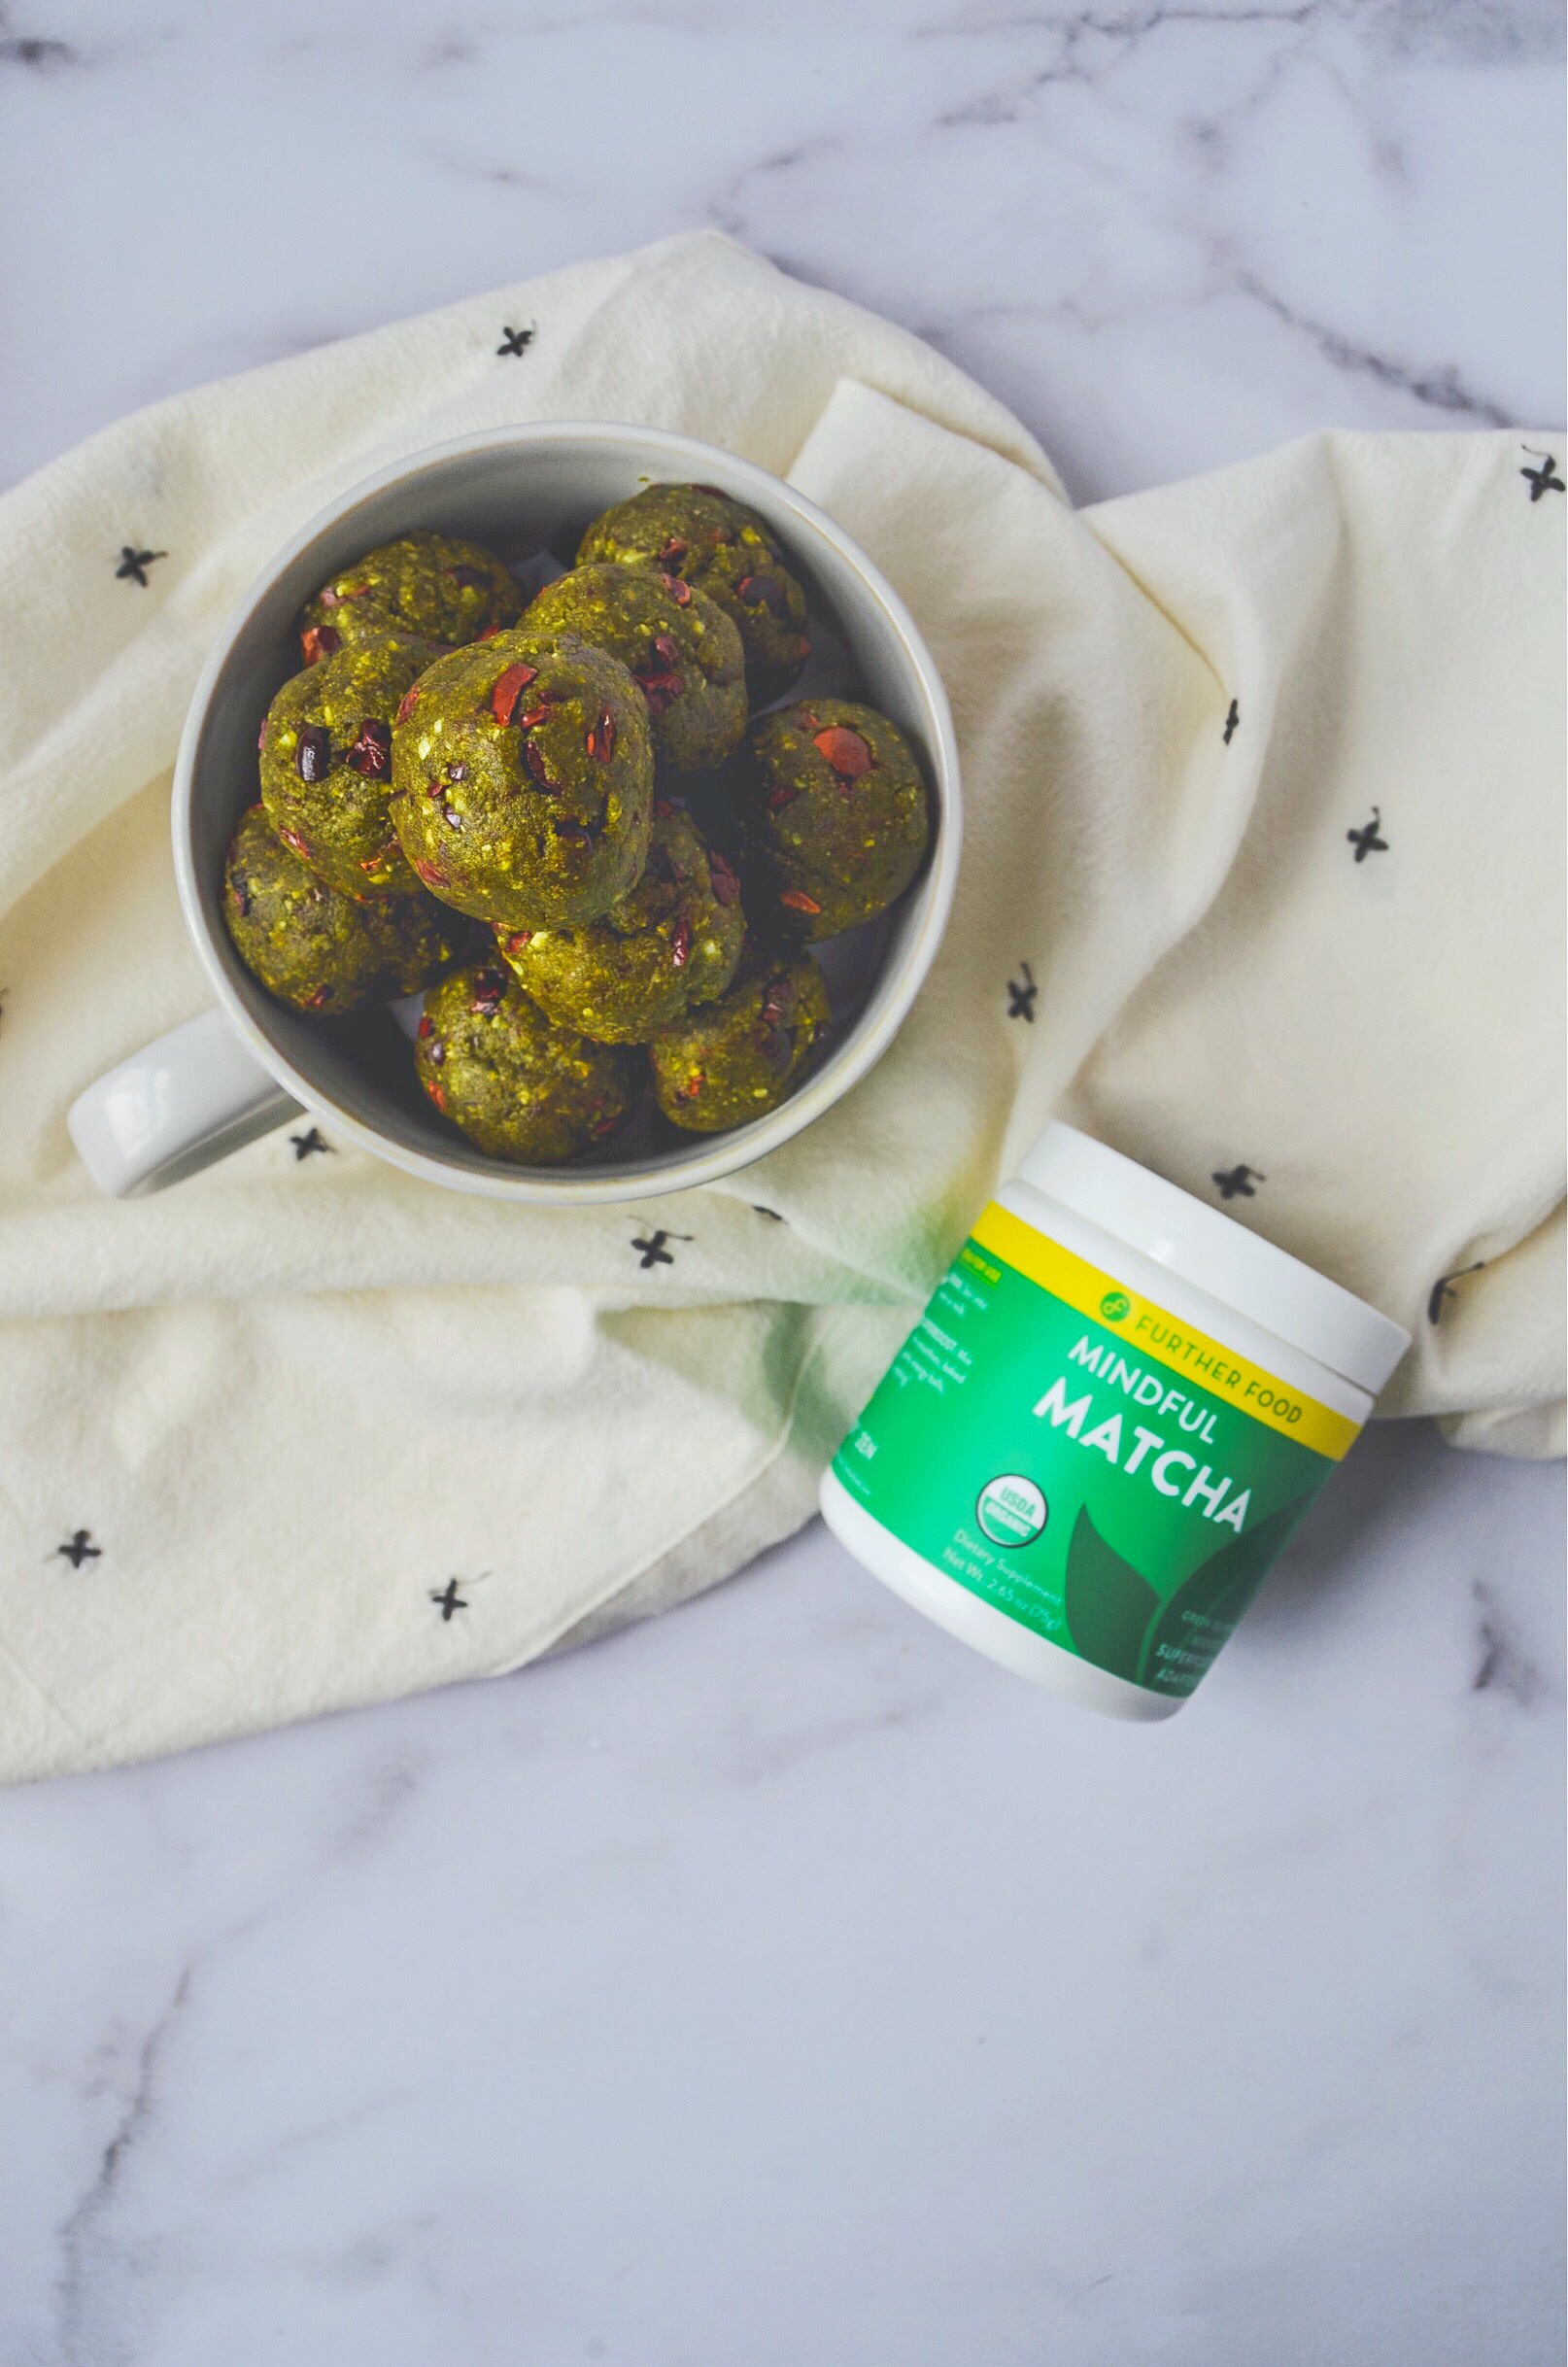
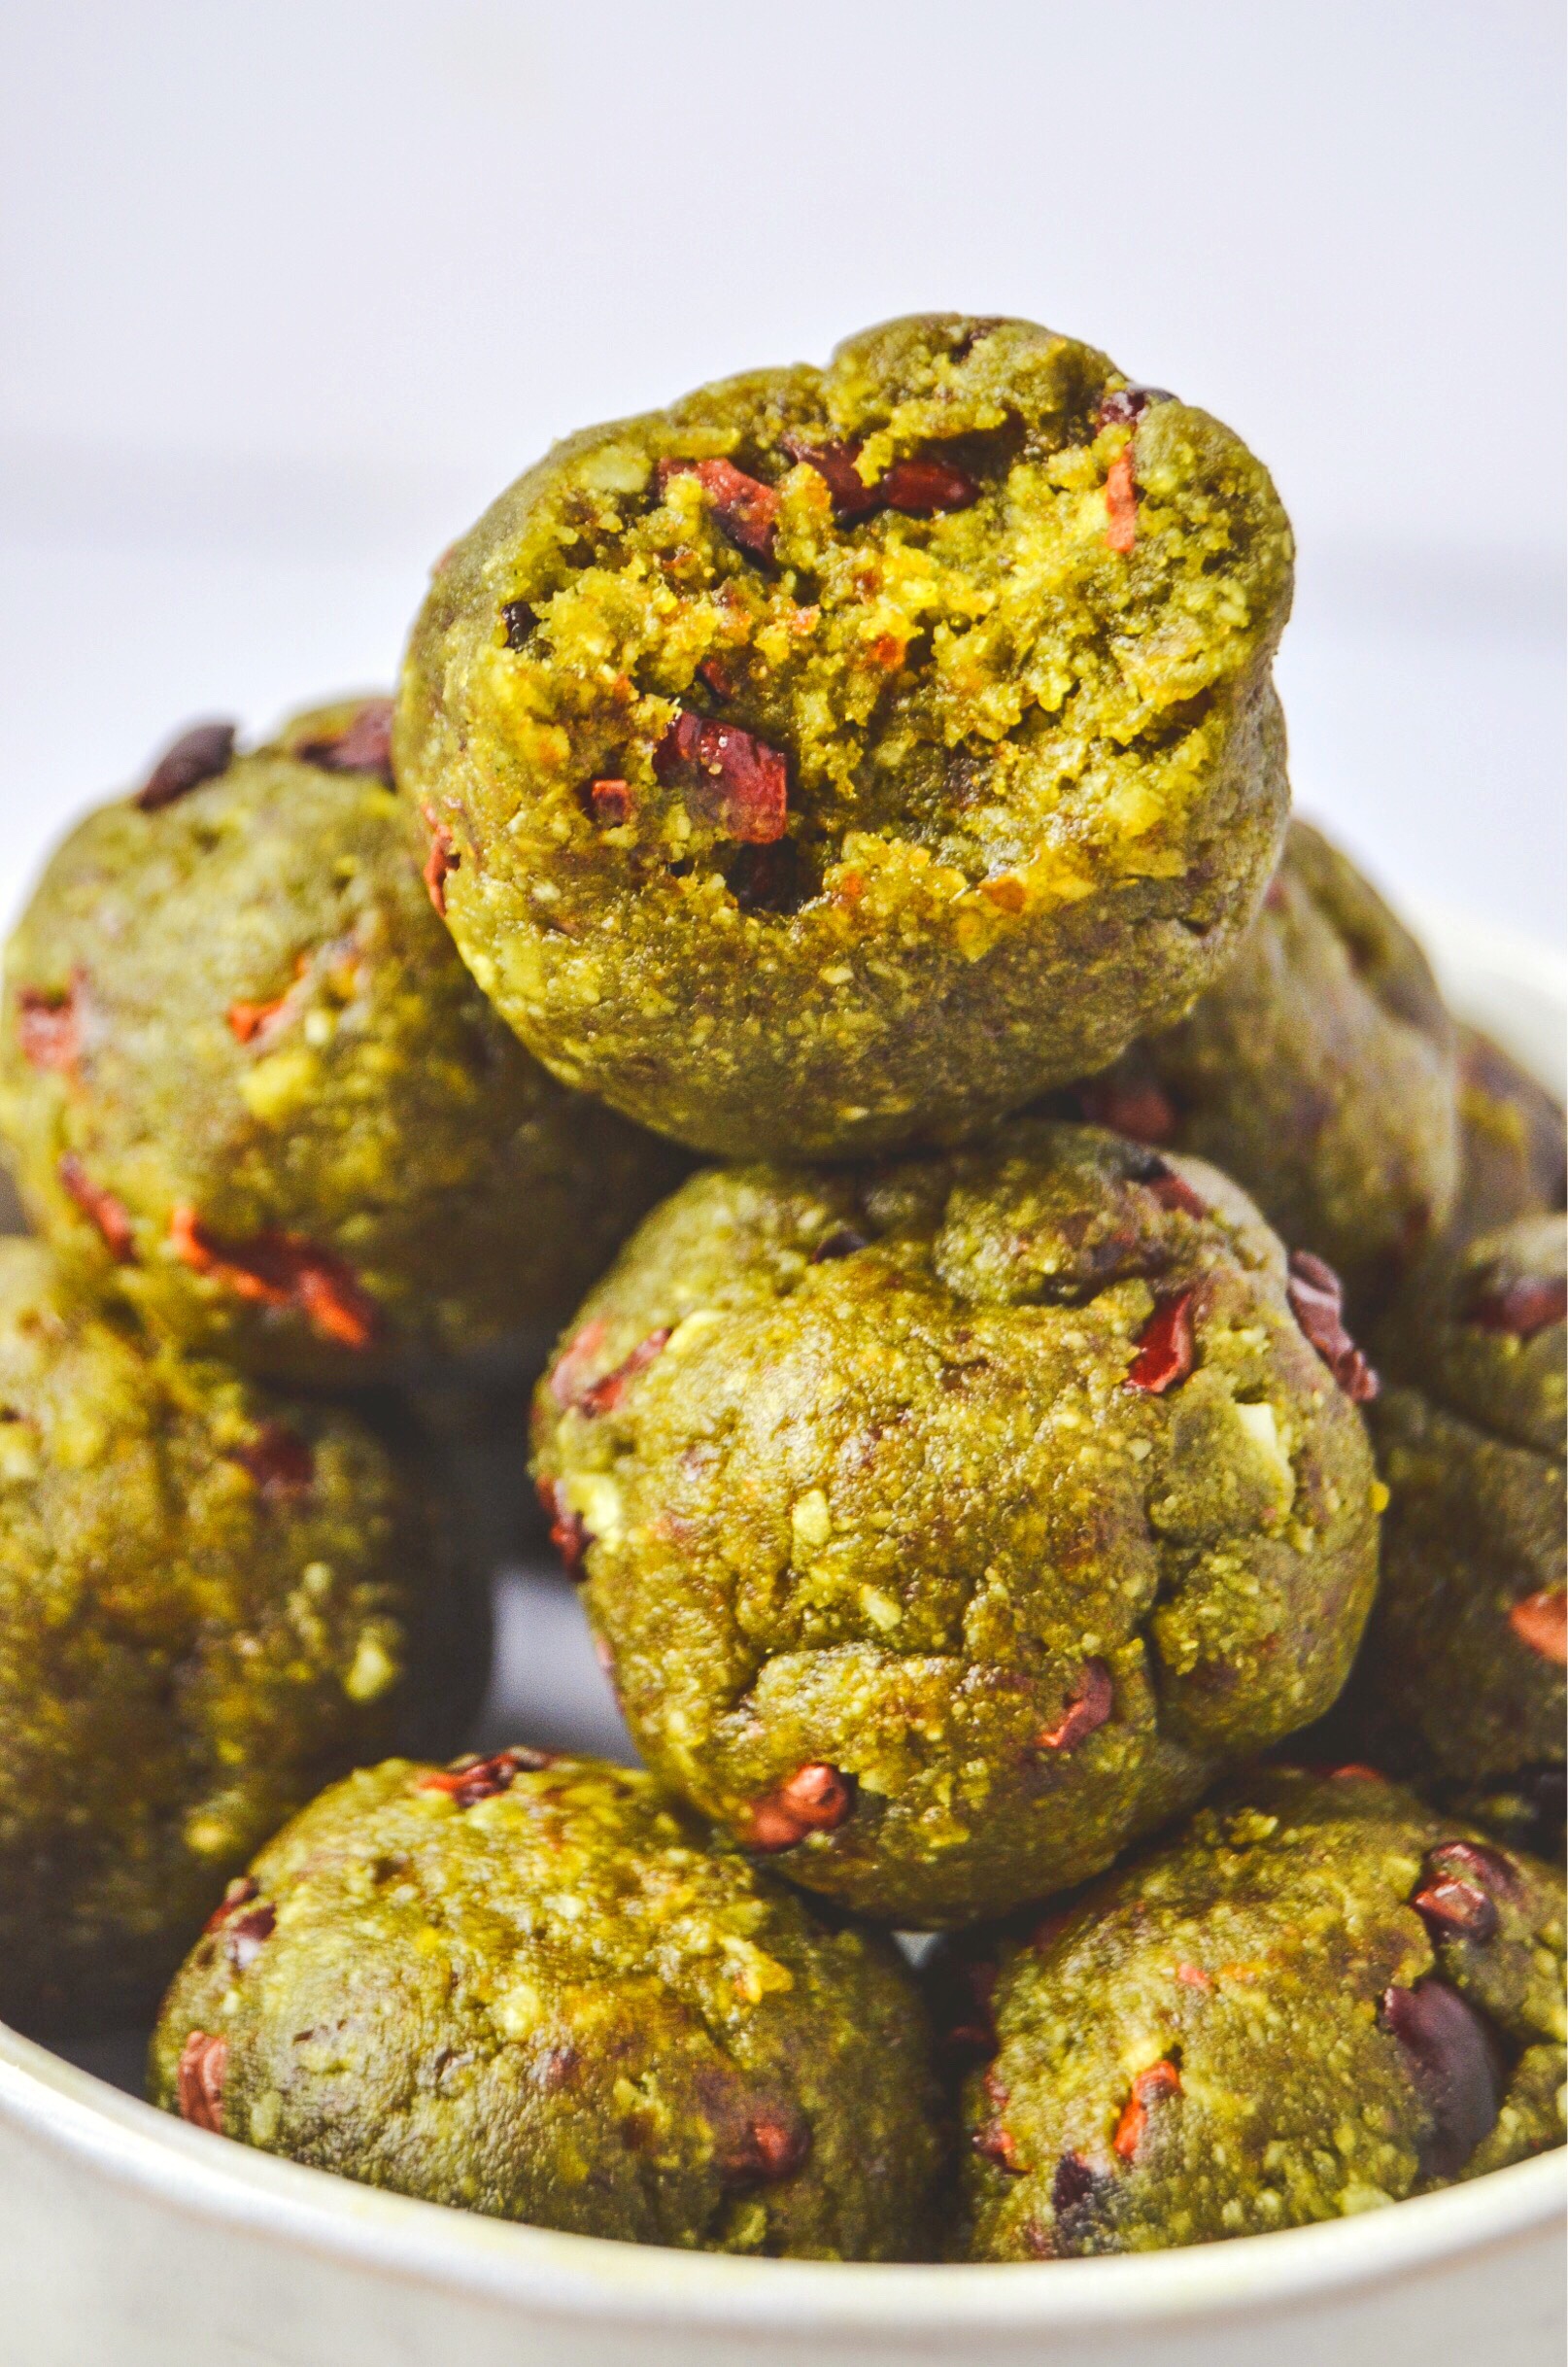
Mindful Matcha and Mint Chip Energy Balls
Matcha to me is like a fine wine. I only want to drink it during those special occasions when the timing is just right. Matcha is also not the cheapest thing in the world so you can probably see where I’m going with this but in all reality, I cherish the benefits and the robust flavor that goes along with it.
You see, matcha comes from the same plant as green tea but since it is made from the entire leaf, it packs in a more concentrated amount of antioxidants and beneficial plant compounds. Matcha powder can stand on its own, but why we can take it up a notch by adding cordyceps mushrooms, ashwagandha, ginger, and wheatgrass.
A tiny burst full of superfood energy! Dairy-free, gluten-free, vegan, paleo friendly, and naturally sweetened.

Matcha to me is like a fine wine. I only want to drink it during those special occasions when the timing is just right. Matcha is also not the cheapest thing in the world so you can probably see where I’m going with this but in all reality, I cherish the benefits and the robust flavor that goes along with it.

You see, matcha comes from the same plant as green tea but since it is made from the entire leaf, it packs in a more concentrated amount of antioxidants and beneficial plant compounds. Matcha powder can stand on its own, but why we can take it up a notch by adding cordyceps mushrooms, ashwagandha, ginger, and wheatgrass.
Okay, let’s pause. I’m sure some of you are asking, “What the heck are these ingredients and why are we adding them”?
Cordyceps Mushrooms: Improves energy, endurance, and strength while helping to reduce fatigue.
Ashwagandha: An herb that can reduce anxiety and stress, help fight depression, boost fertility and may even boost brain function.
Ginger: A spice that is beneficial for people with indigestion and related stomach discomfort.
Wheatgrass: Is prepared from the freshly sprouted leaves of the common wheat plant, Triticum aestivum. Benefits include weight loss, decreased inflammation, lower cholesterol and better blood sugar control.
So, wouldn’t that taste like dirt? I thought the same thing until I used Further Food ‘s mindful matcha powder. The matcha flavor that I love so much masks the earthy flavor of the superfood ingredients, making this powder adaptogenic (herbal pharmaceutical) and superfood enriched! If you are interested in trying their matcha powder, use fromtherootsblog10 for 10% off your first order!

Matcha can stand on its own, but combining matcha with mint and chocolate really takes these energy balls to a new level. Peppermint extract and cacao nibs really bring out the refreshing tones of matcha while being naturally sweetened with medjool dates.
I love knowing that I can treat myself to these first thing in the morning for that burst of refreshing energy or have one as an afternoon or pre-workout snack.
Matcha obsessed? Check out these matcha and carob cookies.
I was not financially compensated for this post. All recipes, photos, and opinions are my own.
If you try this recipe, let us know! Leave a comment, rate it, and don’t forget to tag a photo to #fromtherootsblog on Instagram. We love seeing what you come up with!
Ingredients
¾ cup superfine almond flour
¼ cup coconut flakes
¼ cup cacao nibs or mini dark chocolate chips
8 pitted medjool dates
1 Tbsp coconut oil
1 Tbsp filtered water
2 tsp mindful matcha powder or regular matcha powder
½ tsp organic peppermint extract
Sprinkle of pink himalayan salt
Directions
To a food processor or high powered blender, blend medjool dates until the dates form into a ball. Scoop out and set aside.
To the food processor, add the rest of the ingredients except the cacao nibs and blend until a fine meal is achieved - about 20-30 seconds.
Add the dates back in and blend until fully incorporated: not crumbly, not tacky, but more mold-able. If the mixture is too dry, add 1 tsp water in increments. Be sure to taste the dough for desired flavor. Personally, I like to add more peppermint extract to the dough.
Take the mixture out of the processor and transfer to a small bowl. Fold in cacao nibs or chocolate chips.
Scoop out 1 tablespoon amount and form into a ball. Repeat until all dough is formed into balls.
Chill in refrigerator for 10-15 minutes before serving.
Store leftovers in an airtight container for up to a week in the refrigerator or freezer for up to 1 month.
Notes
Makes 10-12 balls

Fluffy Gluten-Free Pancakes
After seven months of testing out this recipe, I am finally here to say that this is my most favorite gluten-free pancake mix! It’s been a long road but so worth it! You’re probably wondering, why this long!?
Well, I didn’t want to compromise a pancake’s flavor, texture, and simplicity so I basically did everything against that for so long. You see, like the world’s view on nutrition in how it may seem complicated, overly expensive, and trendy, that was the viewpoint I was taking. Strip all that away, and now you’re left with a no-fail, go-to, gluten-free pancake recipe.
A must have recipe to keep in your arsenal of breakfast recipes!

After seven months of testing out this recipe, I am finally here to say that this is my most favorite gluten-free pancake mix! It’s been a long road but so worth it! You’re probably wondering, why this long!?

Well, I didn’t want to compromise a pancake’s flavor, texture, and simplicity so I basically did everything against that for so long. You see, like the world’s view on nutrition in how it may seem complicated, overly expensive, and trendy, that was the viewpoint I was taking. Strip all that away, and now you’re left with a no-fail, go-to, gluten-free pancake recipe.

But like most gluten-free pancake mixes, you need to know some tips in order to make them fluffy like a regular buttermilk pancake.
Tip #1: Let that batter rest!
Tip #2: If using eggs, be sure to use at least one egg white.
Tip #3: Make sure your baking powder and baking soda is fresh.
Tip #4: Do not over-stir the batter
Tip #5: Make sure the batter is of a thicker consistency.

These are great tips I have learned throughout my years of cooking Saturday stacks for my husband, going on 5 years now! We are a bit pancake obsessed.

Have you ever wondered why you’re still hungry after eating a plate of pancakes? Well, regular pancakes do not contain high amount of healthy fats and protein so even if you are not gluten intolerant, these pancakes provides the perfect amount of density to keep you fuller longer!


This GF pancake mix is also very forgiving so if you would like to add fresh fruit, chocolate chips, or additional spices, you can!

If you try this recipe, let us know! Leave a comment, rate it, and don’t forget to tag a photo to #fromtherootsblog on Instagram. We love seeing what you come up with!
Ingredients
½ cup superfine almond flour
½ cup GF whole grain oat flour
¼ cup arrowroot starch/flour
⅓ cup plant based milk
2 whole eggs
1 egg white
1 tsp vanilla extract
1 tsp organic cane sugar
1 tsp baking powder
½ tsp baking soda
½ tsp ground cinnamon
Directions
In a small bowl, whisk dry ingredients.
In a different bowl, whip egg white and eggs until fluffy. Incorporate the rest of the wet ingredients to the eggs until combined.
Slowly whisk wet ingredients into dry ingredients. Do not over-mix.
Let your batter rest for at least 15 minutes.
Heat a large skillet or griddle on low-medium heat or at 375 degrees.
Grease skillet or griddle with butter.
When the skillet/griddle is hot, using a small ladle or ¼ measuring cup, ladle pancake mixture onto skillet.
Cook until small bubbles appear on the surface of the pancake. Slip a spatula underneath, flip and cook for 1-2 minutes until cooked through.
Repeat the same process for the second batch.
Top pancakes with your favorite toppings like almond butter, blueberries, chocolate chips, and maple syrup!
Notes
Makes 6-7 medium size pancakes
Here are the flour brands I use for this recipe: superfine almond flour, GF whole grain oat flour, and arrowroot starch/flour.