Sort by Category
- June 2025
- August 2024
- July 2024
- June 2024
- May 2024
- February 2024
- January 2024
- December 2023
- November 2023
- October 2023
- September 2023
- August 2023
- July 2023
- March 2023
- February 2023
- January 2023
- December 2022
- November 2022
- October 2022
- September 2022
- August 2022
- June 2022
- May 2022
- April 2022
- March 2022
- February 2022
- January 2022
- December 2021
- November 2021
- October 2021
- September 2021
- August 2021
- July 2021
- June 2021
- May 2021
- April 2021
- March 2021
- February 2021
- January 2021
- December 2020
- November 2020
- October 2020
- September 2020
- August 2020
- July 2020
- June 2020
- May 2020
- April 2020
- March 2020
- February 2020
- January 2020
- December 2019
- November 2019
- October 2019
- September 2019
- August 2019
- July 2019
- June 2019
- May 2019
- April 2019
- March 2019
- February 2019
- January 2019
- December 2018
- November 2018
- October 2018
- September 2018
- August 2018
- July 2018
- June 2018
- May 2018
- April 2018
- March 2018
- February 2018

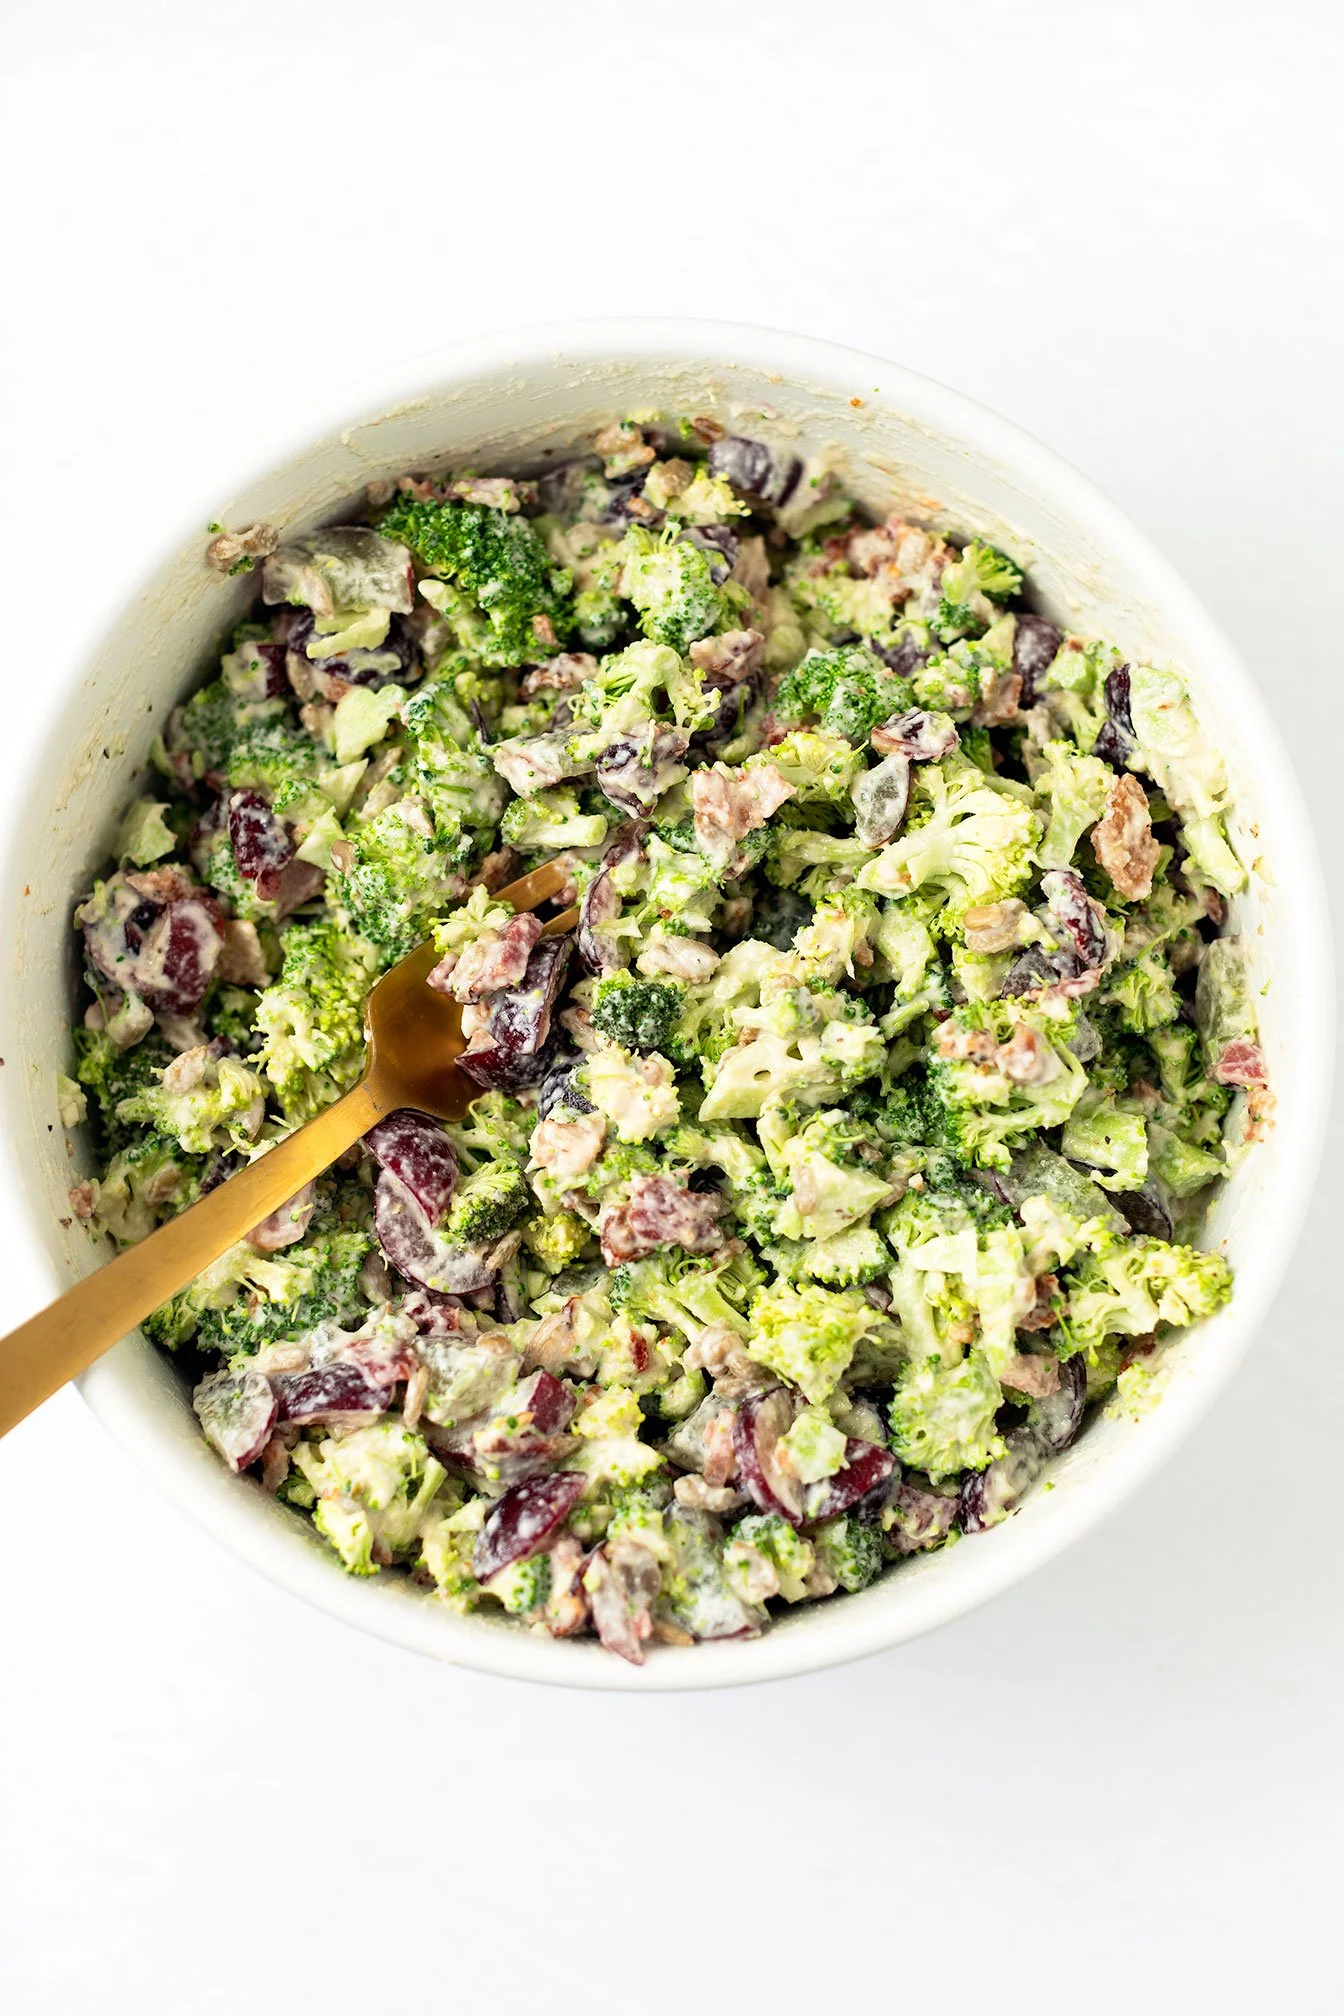
Broccoli Salad
The ultimate dairy and gluten-free broccoli salad for any occasion. Your guests will never suspect it's actually good for them!
The ultimate dairy and gluten-free broccoli salad for any occasion. Your guests will never suspect it's actually good for them!

BROCCOLI SALAD RECIPE HIGHLIGHTS
Incredibly simple to prepare!
The dairy-free dressing will quickly become your preferred choice for any dish. It's naturally sweetened and provides a good balance of fat and protein.
Perfect for preparing in advance, making it suitable for various occasions such as barbecues, potlucks, or weekday lunches.
Ideal for those who dislike red onions! *However, if you're a fan like me, feel free to include ⅓ cup of red onion in the salad!
I've been making this for years, and it's always a big hit! #noleftovers

TIME SAVING TIPS BEFORE AN EVENT
Buy fresh pre-cut broccoli or prepare and wash your broccoli the day before the event.
Cook bacon for breakfast, setting aside some for breakfast and chopping the rest for the broccoli salad.
Soak cashews overnight to make the dressing the next day, or boil them for 10 minutes.
Remember to chill the recipe in the fridge. This allows the broccoli to absorb the dressing, enhancing the flavor of the salad!

Looking for more nutritious and enjoyable crowd-pleasing recipe ideas? Explore: Apple Pecan and Bacon Salad with Caramelized Shallot Vinaigrette Dressing, Hasselback Sweet Potatoes, Prosciutto Wrapped Figs, Roasted Beet Hummus.
If you try this recipe, let us know! Leave a comment, rate it, and don’t forget to tag a photo to #fromtherootsblog on Instagram. We love seeing what you come up with!
The ultimate dairy and gluten-free broccoli salad for any occasion. Your guests will never suspect it's actually good for them!
Servings: 6 Prep: 15 MIN Cook time: 0 MIN
Ingredients
For the salad
2 large broccoli crowns (florets only), finely chopped
½ cup bacon, chopped
1 ½ cups seedless red grapes, quartered
⅓ cup dried cranberries or dried cherries
⅓ cup roasted or raw sunflower seeds
2 Tbsp lemon juice
S+P to season
For the dressing
1 cup raw cashews, soaked
¼ cup water
2-4 Tbsp pure maple syrup
2 Tbsp apple cider vinegar
½ tsp minced garlic
1 tsp sea salt
½ tsp ground black pepper
Instructions
For the dressing: Place cashews in a bowl and cover cashews with water and soak for 2 hours or overnight. (if you are short on time, soak them in boiling water for 10 min).
Drain cashews and transfer to blender with the rest of the dressing ingredients. Blend until completely smooth and creamy. If dressing is too thick, add 1 Tbsp increments of water until desired creaminess. *2-4 Tbsp syrup is for desired sweetness.
For the salad, Place broccoli, grapes, sunflower seeds, dried cranberries, bacon bits and lemon juice in a large mixing bowl. Add dressing and toss thoroughly to coat. Season with salt and pepper and lemon juice to taste. Serve chilled.

Strawberry Cheesecake Protein Balls
HERE’S WHY WE LOVE THEM:
An adequate amount of protein per serving
No baking required, easy to prepare
Minimal ingredients needed
A healthy Valentine's Day snack or dessert
Ideal as a pre/post workout snack
Craving a sweet treat that won't sabotage your healthy lifestyle? Try these Strawberry Cheesecake Protein Balls – they're a hit with gym goers and perfect for satisfying your sweet tooth.

HERE’S WHY WE LOVE THEM:
An adequate amount of protein per serving
No baking required, easy to prepare
Minimal ingredients needed
A healthy Valentine's Day snack or dessert
Ideal as a pre/post workout snack


WHAT MAKES THEM SO PROTEIN-PACKED?
This recipe uses nut butter and a clean protein powder source as its primary protein sources. We recommend using the vanilla flavor from Equip Foods – it provides the perfect balance of sweetness and nutrition. If you're interested in trying this protein powder, use the code ROOTS at checkout to receive 15% off. Don't forget to subscribe to our newsletter for more exclusive promo codes from this brand!


If you try this recipe, let us know! Leave a comment, rate it, and don’t forget to tag a photo to #fromtherootsblog on Instagram. We love seeing what you come up with!
Craving a sweet treat that won't sabotage your healthy lifestyle? Try these Strawberry Cheesecake Protein Balls – they're a hit with gym goers and perfect for satisfying your sweet tooth.
Servings: 36-38 balls Prep: 5 MIN Cook time: 0 MIN
Ingredients
3 cups gluten-free oats (or oat flour)
1 cup vanilla protein powder
2 Tbsp ground cinnamon
½ tsp pink Himalayan sea salt
1 cup pure maple syrup
1 ½ cup nut butter
½ cup coconut oil (half melted)
1 tsp vanilla extract
¼ - ½ cup white chocolate chips
1/4-1/2 cup freeze dried strawberries
Instructions
In a food processor, blend oats until flour consistency and then add the rest of the ingredients to process minus the chocolate chips. Fold in the white chocolate chips and use a 1 tbsp measuring spoon or cookie scooper to turn into balls!
Notes
Although it's not necessary, melting the coconut oil can improve the dough's texture and the distribution of the white chocolate chips throughout the balls, creating a delightful cheesecake flavor.
Use code: ROOTS for 15% off our preferred clean protein powder source!

Tart Cherry Sleepy Time Mocktail
Are you looking for a delicious and healthy drink that can help you get a good night's sleep? Introducing the Tart Cherry Sleepy Time Mocktail - the perfect nightcap for anyone looking to improve their sleeping habits and gut health!
As a nutritionist and personal trainer, I understand the importance of sleep, and I have been drinking this mocktail for the past 9 months. It has become my go-to recipe, and it has even gone viral on TikTok!
Tart Cherry Sleepy Time Mocktail: A Nightly Drink for Restful Sleep and Gut Health

Are you looking for a delicious and healthy drink that can help you get a good night's sleep? Introducing the Tart Cherry Sleepy Time Mocktail - the perfect nightcap for anyone looking to improve their sleeping habits and gut health!
As a nutritionist and personal trainer, I understand the importance of sleep, and I have been drinking this mocktail for the past 9 months. It has become my go-to recipe, and it has even gone viral on TikTok!

What Makes the Sleepy Girl Mocktail?
The recipe only requires two key ingredients: pure tart cherry juice or concentrate and magnesium powder. Here's why they are essential for a good night's sleep:
Pure Tart Cherry Juice - Tart cherries contain a high concentration of melatonin, a hormone that regulates the sleep-wake cycle and induces drowsiness at night. They are also rich in the amino acid tryptophan, which helps the body produce serotonin, a neurotransmitter that promotes relaxation.
Magnesium - Magnesium glycinate is a vital mineral that regulates melatonin and cortisol production, promoting muscle relaxation and reducing anxiety.
This power couple is linked to positive sleep results, making this mocktail perfect for your nighttime routine.

Mocktail Beneficial Add-Ins
Citrus - Adding fresh citrus juice like lemon or lime provides vitamin C, which supports your adrenals and helps your body recover from stress-related damage.
Prebiotic Soda or Mineral Water - Top off your mocktail with prebiotic soda or mineral-enriched bubbly water. Not only does it taste great, but it also supports beneficial gut bacteria. However, be aware that prebiotics may trigger digestive discomfort like gas and bloating.
Favorite sources: Poppi cherry lime flavor and lime flavored Topo Chico mineral water
Sea Salt - Add a pinch of sea salt to support your adrenal glands and promote optimal hydration. Sea salt is also rich in magnesium, which helps promote restful, deep sleep.
Now that you have the nutritional background on this viral TikTok drink, start making your own and enjoy a restful sleep and improved gut health! Check out the Nourished Roots membership for more tips on supporting optimal sleep.
MORE HEALTHY MOCKTAIL + BEVERAGES
If you try this recipe, let us know! Leave a comment, rate it, and don’t forget to tag a photo to #fromtherootsblog on Instagram. We love seeing what you come up with!
Tart Cherry Sleepy Time Mocktail: A Nightly Drink for Restful Sleep and Gut Health
Servings: 1 Prep: 5 MIN Cook time: 0 MIN
Ingredients
¼ cup tart cherry juice or 2 Tbsp tart cherry juice concentrate
1 scoop or serving magnesium powder
Top with prebiotic soda or mineral sparkling water
pinch of sea salt
Ice
Directions
Start by pouring cherry juice or concentrate into a tall glass. Mix in magnesium powder and add ice. Top it off with soda or mineral water, and stir until all the ingredients are well combined. For an extra zing, squeeze in lime juice and add a pinch of sea salt. Finally, sit back, relax, and enjoy the rest of your night!
SHOP OUR FAVORITE INGREDIENTS FOR THIS RECIPE!


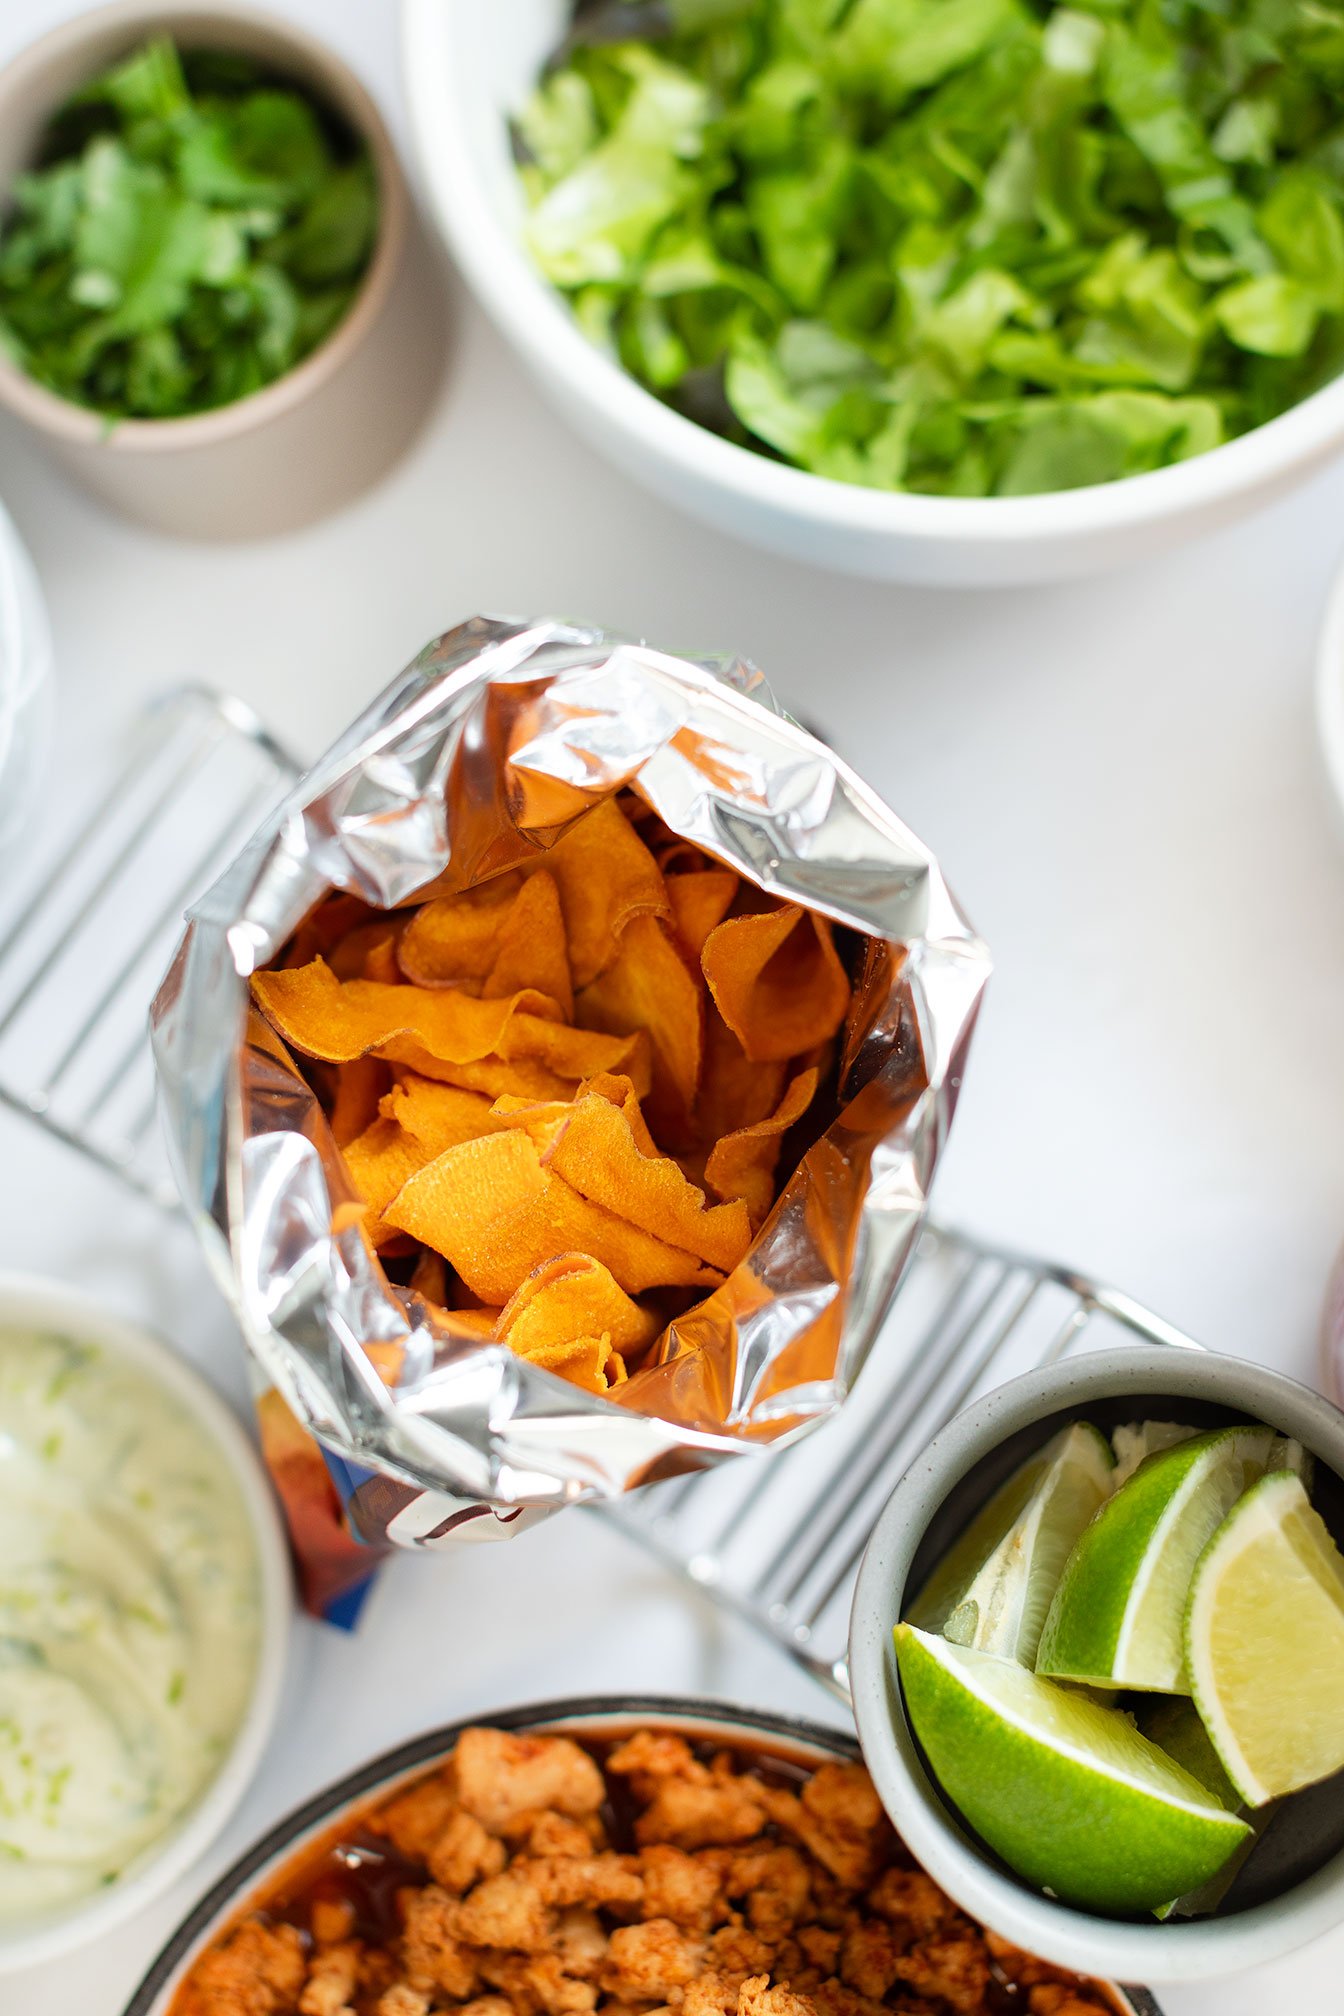
Gluten Free Walking Tacos
Have you ever tried a walking taco? It's the perfect meal for those who are short on time, love customization, and want to keep it healthy. This meal is perfect for quick lunches, lazy family dinners, or even game night!
When I was a child, my family would make tacos in individual-sized chip bags like Fritos or Doritos. This allowed us to choose our own toppings, while also eating right out of the bag, making it mess-free for our parents. It was a delightful experience!
Healthy Walking Tacos: A Quick, Fun, and Customizable Meal

Have you ever tried a walking taco? It's the perfect meal for those who are short on time, love customization, and want to keep it healthy. This meal is perfect for quick lunches, lazy family dinners, or even game night!


When I was a child, my family would make tacos in individual-sized chip bags like Fritos or Doritos. This allowed us to choose our own toppings, while also eating right out of the bag, making it mess-free for our parents. It was a delightful experience!
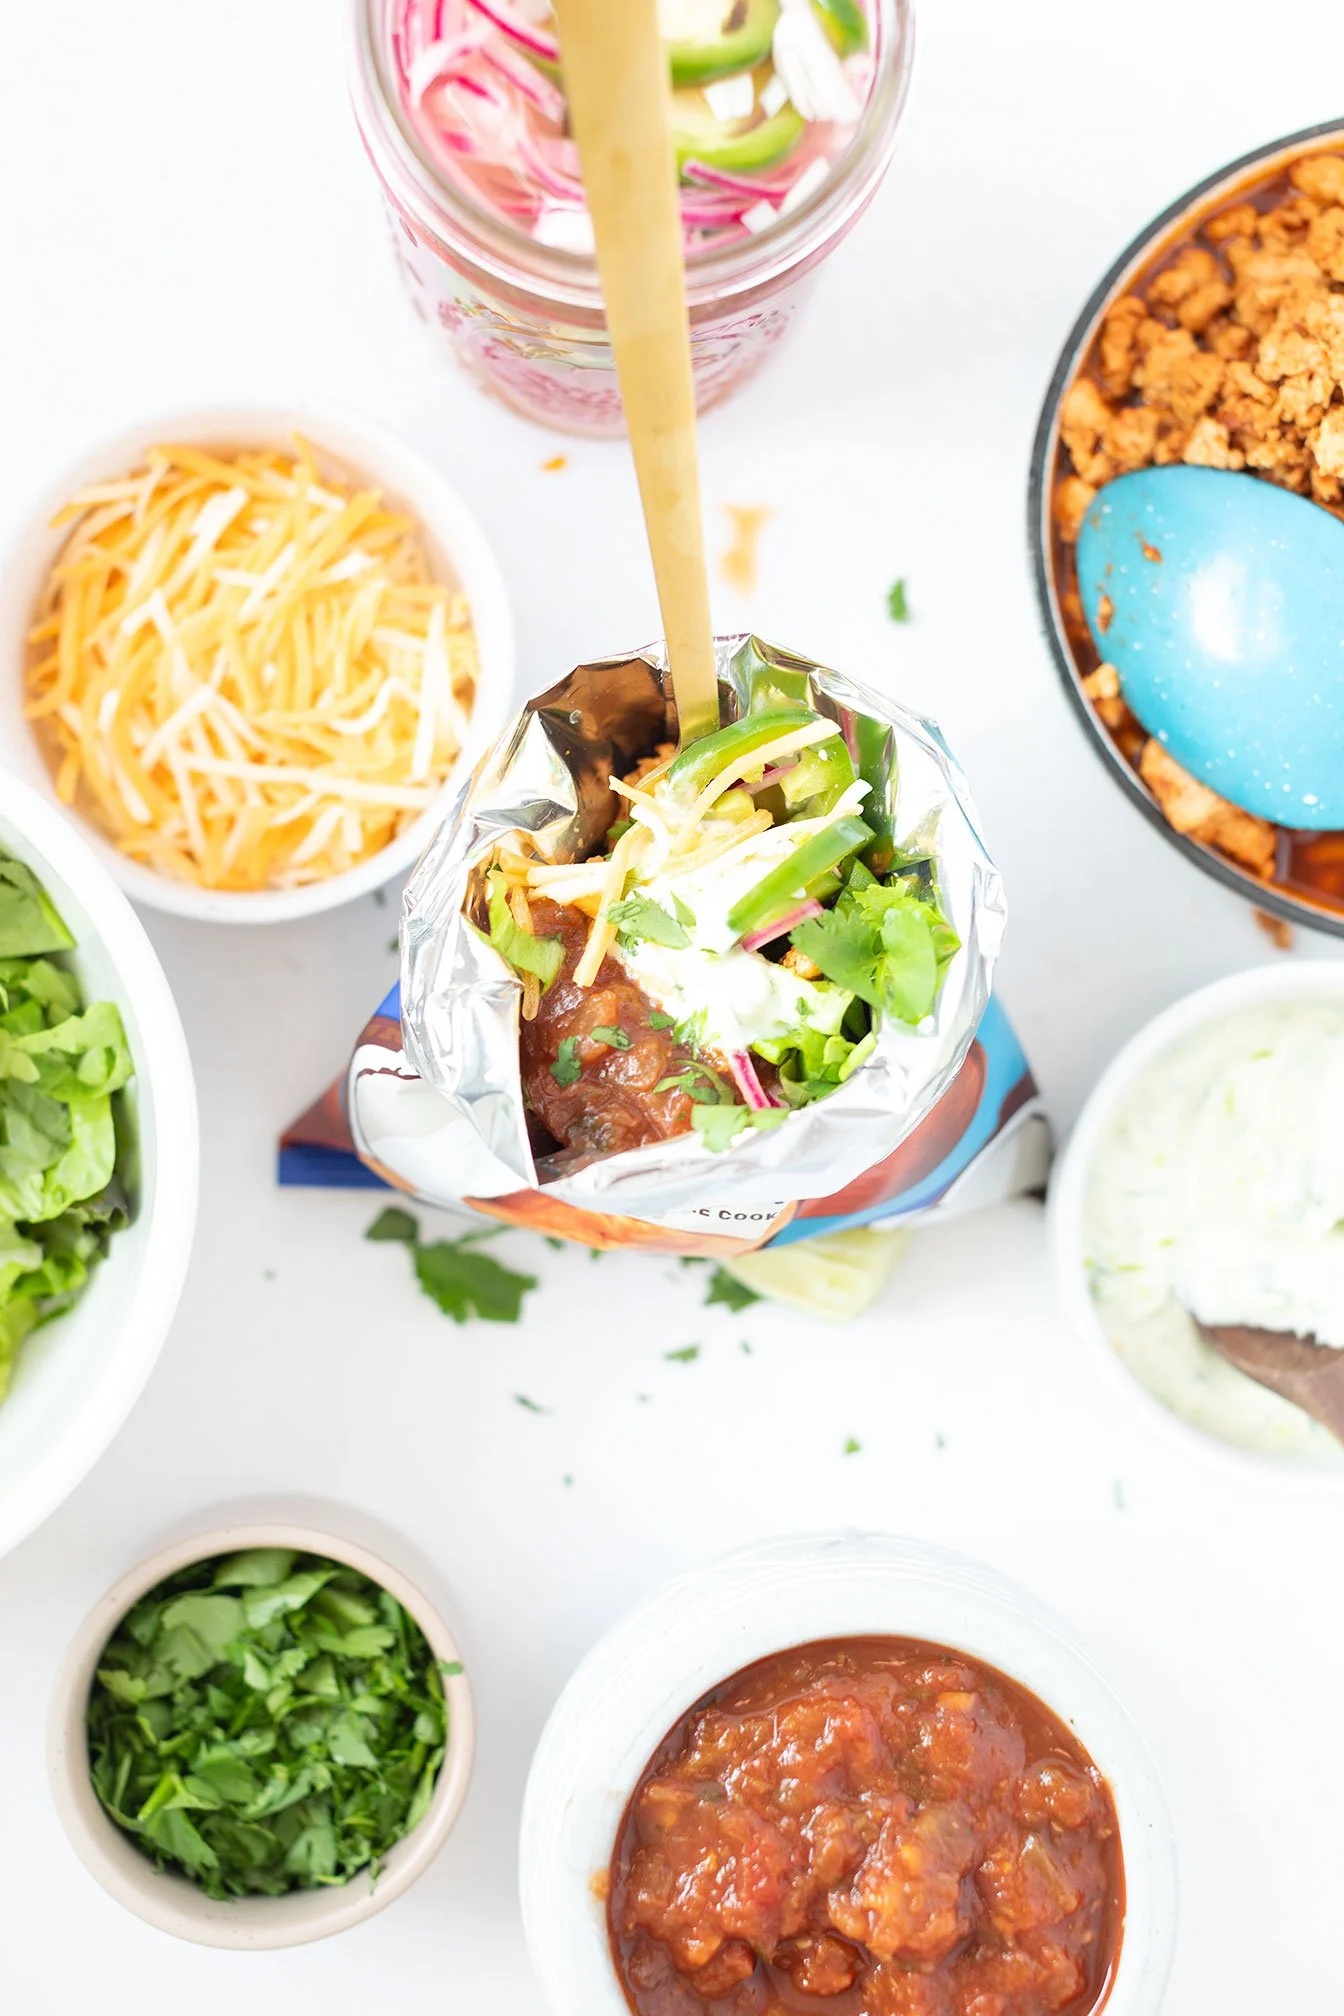

HOW TO MAKE YOUR WALKING TACO
Assembling your walking taco is easy and fun! Just gather all your favorite taco toppings and go from there. You can even choose healthy and gluten-free options!
grass-fed ground meat
shredded lettuce
fresh organic salsa
lactose free or organic raw shredded cheese
pickled onions (with addition of jalapeños) pg. 54 in cookbook
avocado lime crema pg. 45 in cookbook
Gluten-free chips that are made in premium avocado or coconut oil like Jackson’s chips.

Want more healthy and fun Mexican inspired recipes? Check out: Mexican eggs Benedict, Paleo Crunchwrap Supreme, and Mexican Harvest Turkey Chili.
If you try this recipe, let us know! Leave a comment, rate it, and don’t forget to tag a photo to #fromtherootsblog on Instagram. We love seeing what you come up with!
Servings: 4 Prep: 10 MIN Cook time: 10 MIN
Ingredients
To make taco meat:
1 lb grassfed ground meat (beef, chicken, turkey)
1 packet of siete foods taco seasoning
⅓ cup water
Toppings:
individual chip bags (favorites: Jackson’s Chips, Siete Foods, Barnana Plaintain chips)
shredded lettuce
diced tomatoes or salsa
avocado
lime wedges
cilantro
cheese or queso
sour cream or greek yogurt
Instructions:
To a skillet, add 1 Tbsp avocado oil over medium high heat. Add your ground meat to the skillet and break apart as it cooks. Mix in the seasonings and water once browned. Transfer the meat into a bowl and set aside until ready to assemble walking tacos.
Prepare the rest of the toppings of your choice!
When ready to assemble, take individual sized chip bags and roll down the tops. (You can also add chips to a bowl if you don’t have chip bags!) Fill the bags or bowl with taco meat and the rest of your desired toppings. Enjoy!

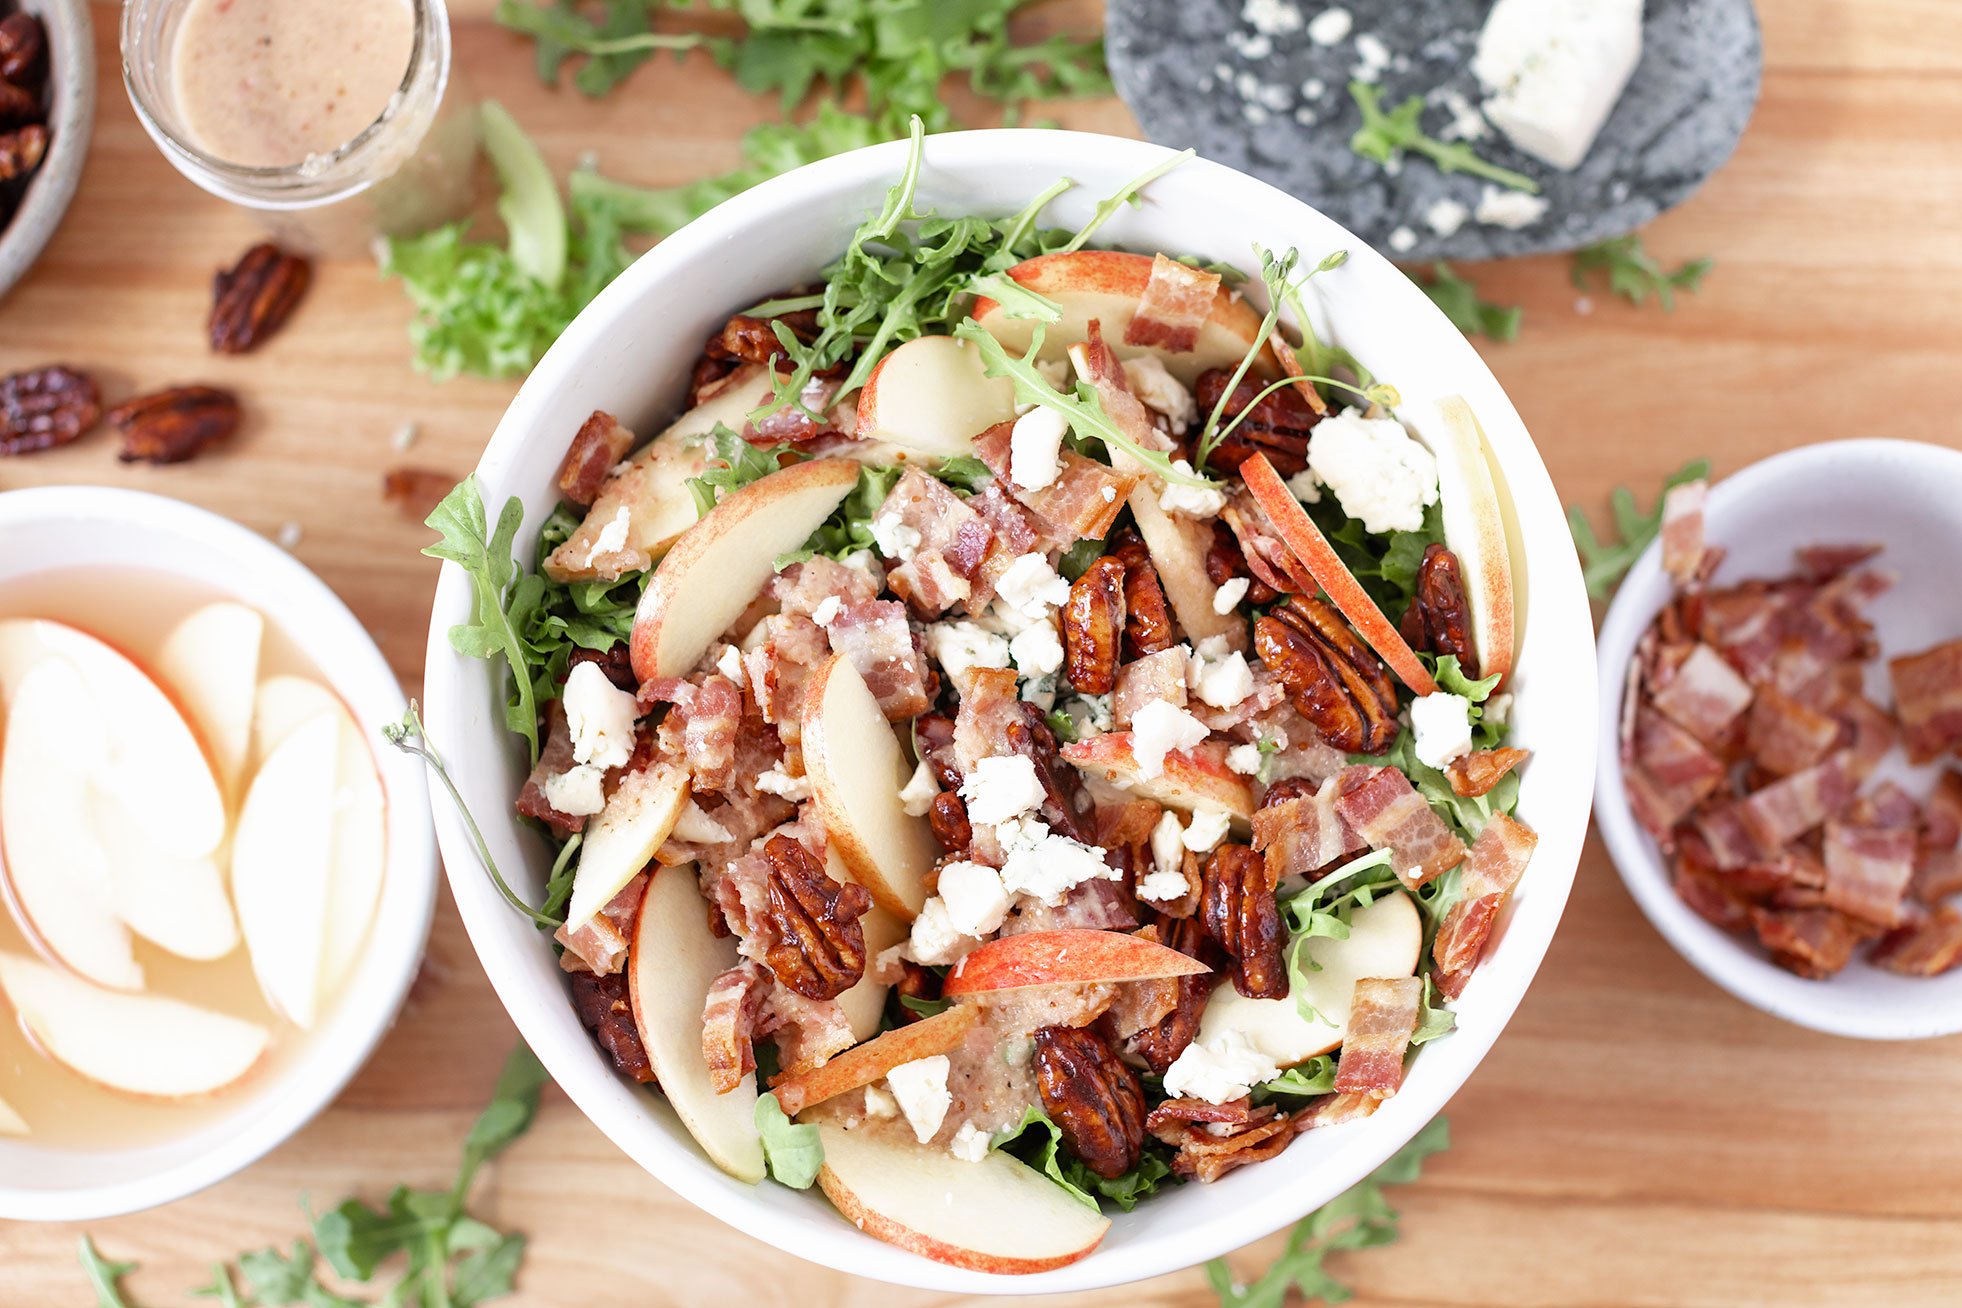
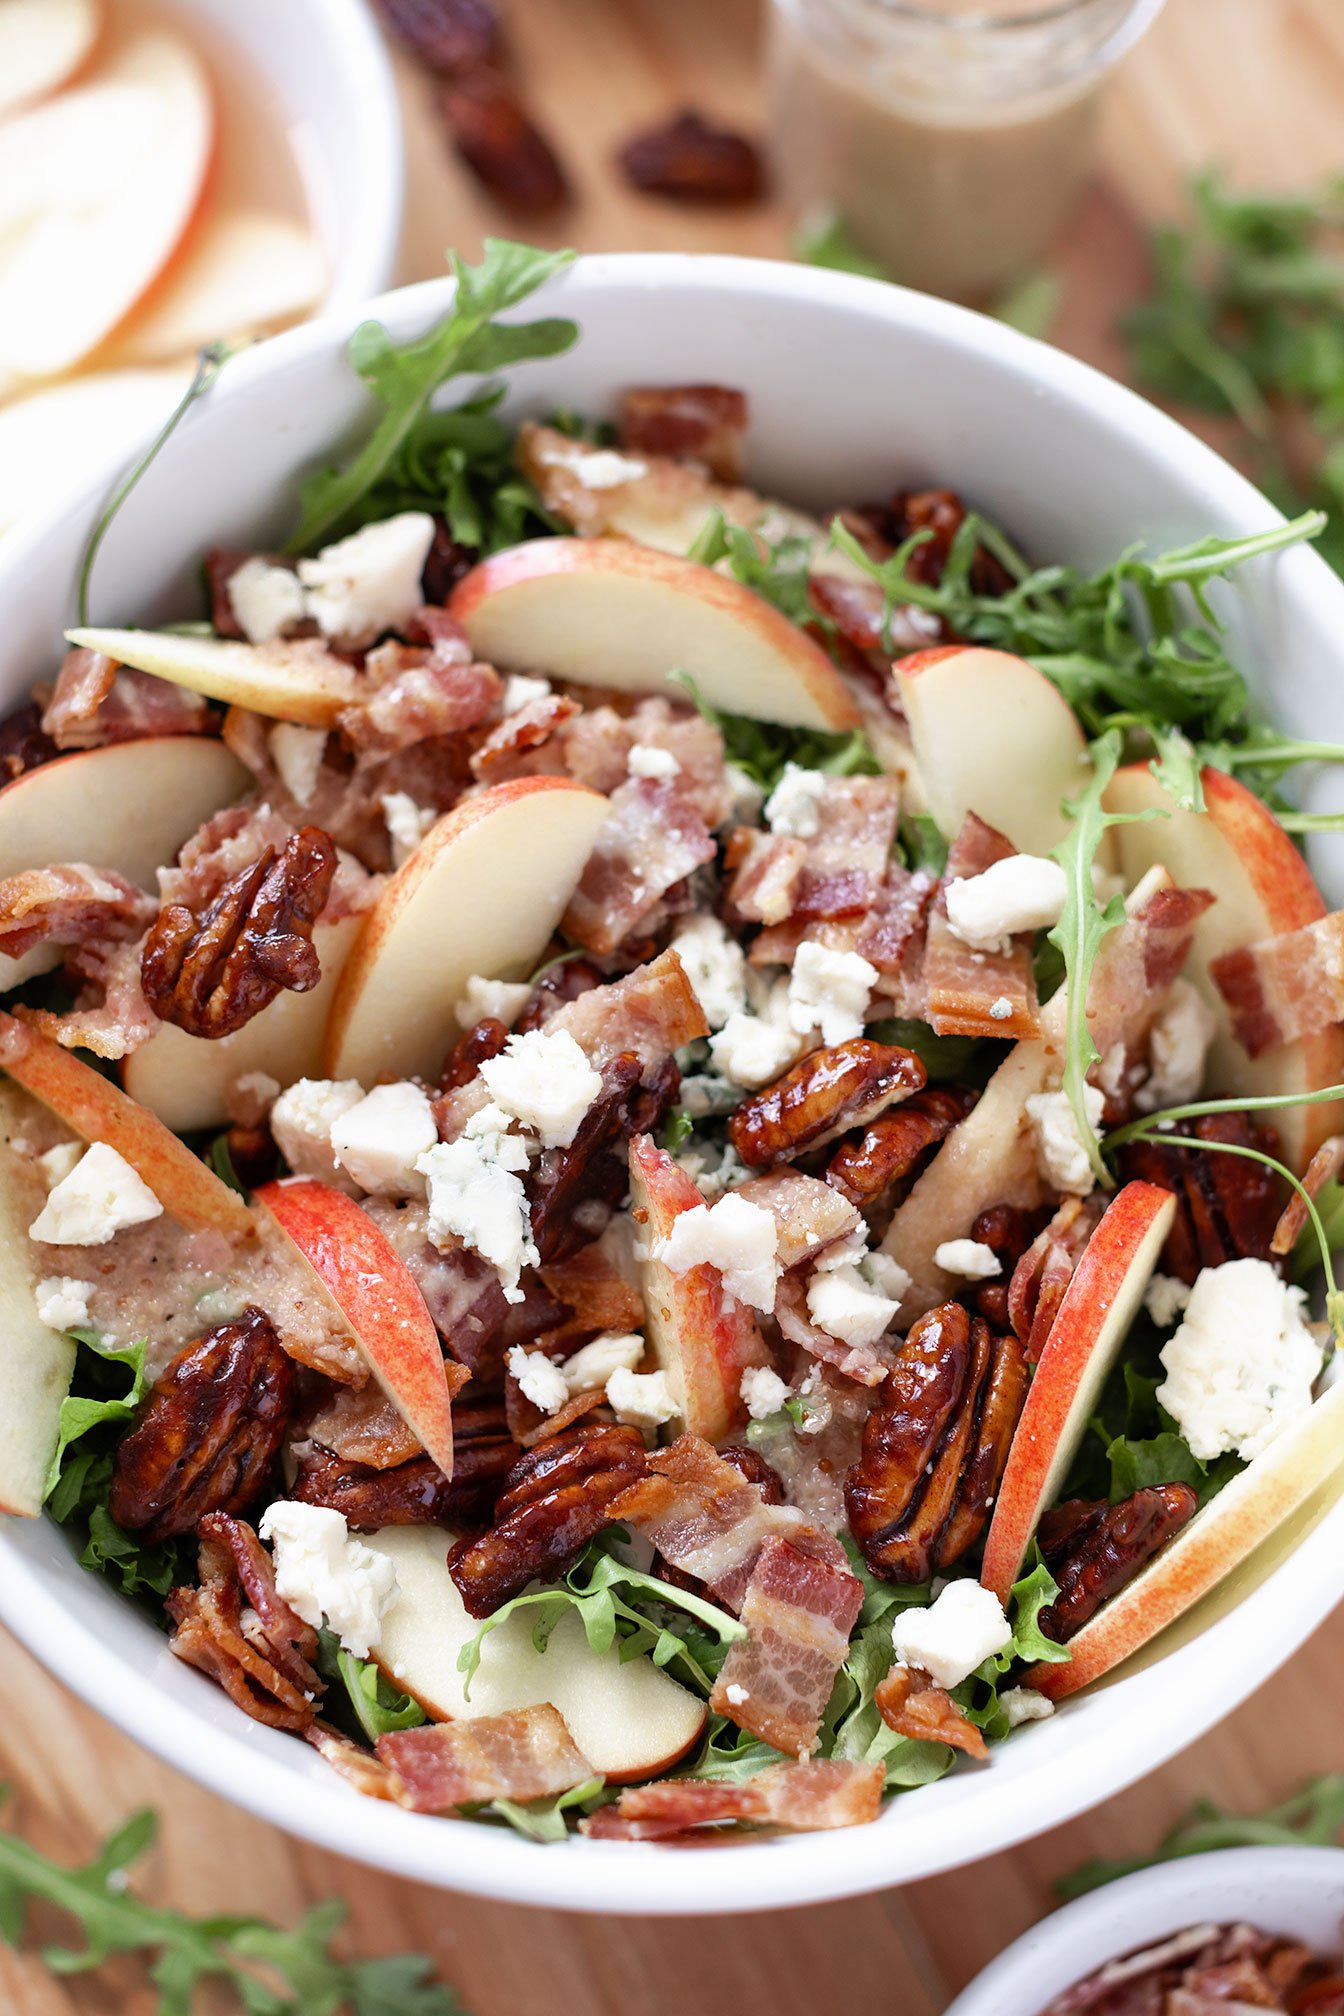
Apple Pecan and Bacon Salad with Caramelized Shallot Vinaigrette Dressing
With Thanksgiving, holiday parties, and gatherings in full swing, there's no better way to impress your friends and family than with this go-to holiday salad.
Crisp apples, candied maple pecans, crunchy bacon, and creamy blue cheese are combined with a caramelized shallot and garlic vinaigrette to create a mouthwatering dish.
Indulge in the festive Apple Pecan and Bacon Salad with Caramelized Shallot Vinaigrette dressing. This salad is perfect for the holidays, with a delicious blend of sweet and savory flavors.
With holiday parties and gatherings in full swing, there's no better way to impress your friends and family than with this go-to holiday salad.
Crisp apples, candied maple pecans, crunchy bacon, and creamy blue cheese are combined with a caramelized shallot and garlic vinaigrette to create a mouthwatering dish.


EASY SALAD PREPARATION DURING THE BUSY HOLIDAY SEASON
What I truly love about this salad are the different salad components that can be prepped AHEAD of time! Let’s break it down:
Keep apples fresh and crisp
To prevent apple slices from browning quickly, soak them in a mixture of water and lemon juice. This easy trick will help keep your apples looking and tasting fresh for longer.
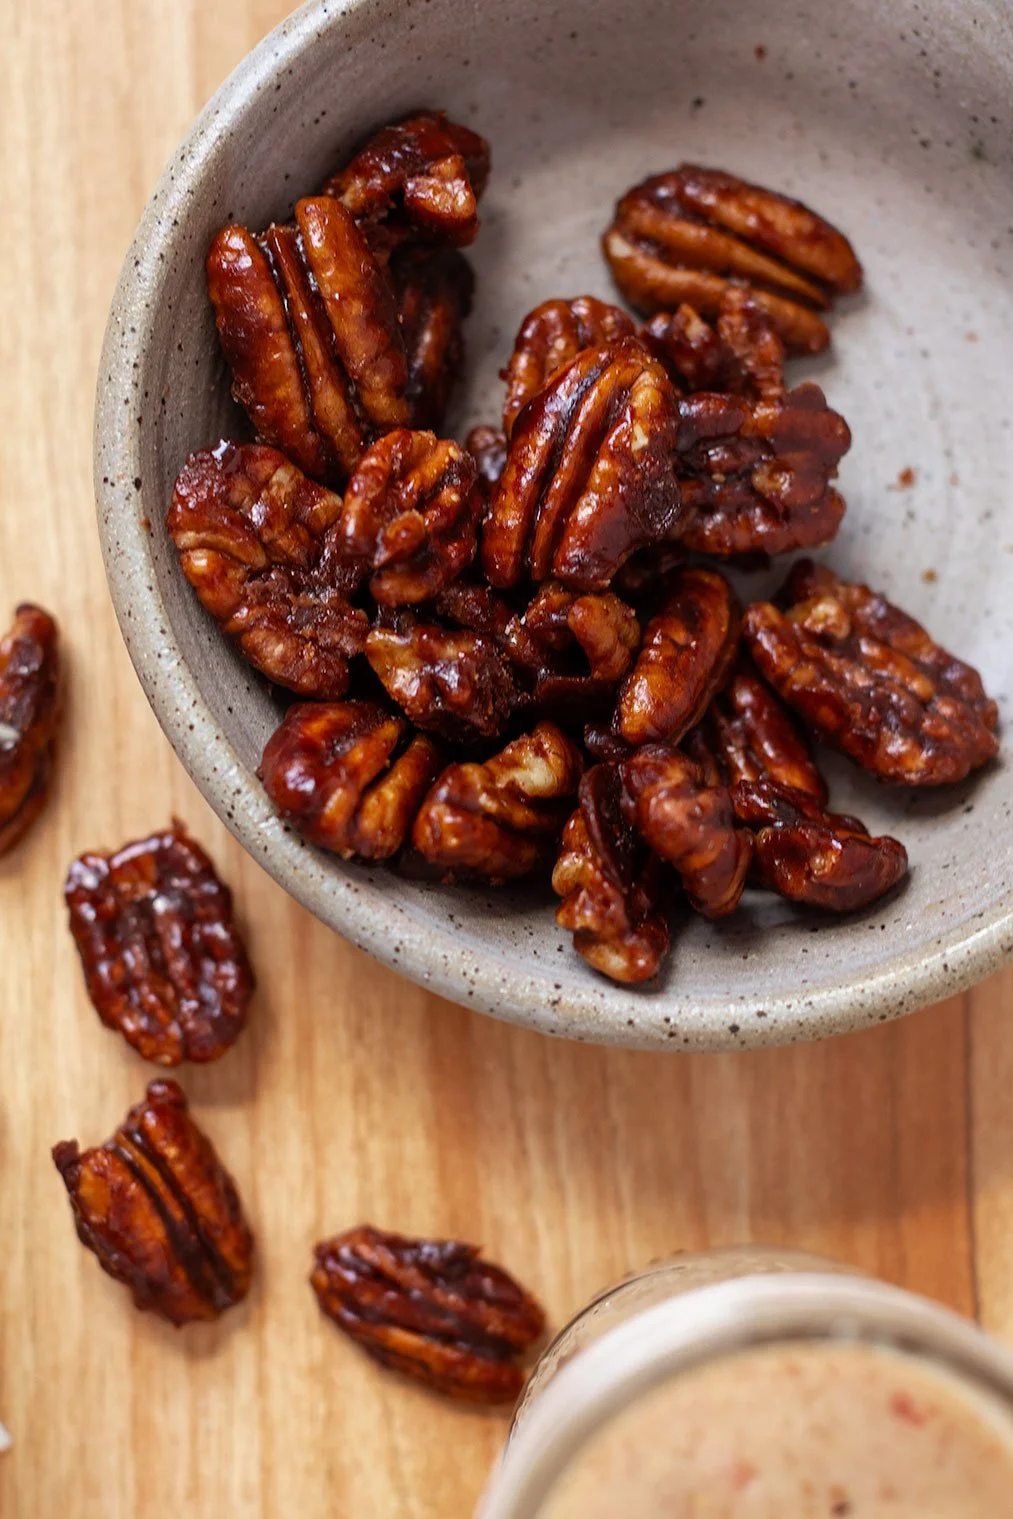
Preparing Candied Maple Pecans
For best results, make your candied maple pecans the day before you plan to use them. Once you've finished cooking them in a skillet, let them cool to room temperature before transferring them to the fridge to chill until needed.
Caramelized Shallot and Garlic Vinaigrette
Begin by caramelizing a mixture of shallots and garlic in the skillet you just used to make the candied maple pecans. Then, add the mixture to a food processor with the remaining dressing ingredients. Store the dressing in an airtight container until you're ready to use it.
If you try this recipe, let us know! Leave a comment, rate it, and don’t forget to tag a photo to #fromtherootsblog on Instagram. We love seeing what you come up with!
Indulge in the festive Apple Pecan and Bacon Salad with Caramelized Shallot Vinaigrette dressing. This salad is perfect for the holidays, with a delicious blend of sweet and savory flavors.
Servings: 4-6 Prep: 10 MIN Cook time: 20 MIN
Ingredients
1 - 12 oz package of uncured, no sugar bacon
1 - container mixed greens
2 large handfuls arugula
6 oz blue cheese
1 large gala apple
to make the candied maple pecans
1 cup raw pecans
1 Tbsp grass-fed butter, ghee, or coconut oil
⅓ cup pure maple syrup
½ tsp cinnamon
¼ tsp smoked paprika
¼ tsp sea salt
to make the shallot vinaigrette
3 cloves of garlic, mashed
2 large shallots, thinly sliced
2 Tbsp apple cider vinegar
2 Tbsp pure maple syrup
1 Tbsp dijon mustard
¼ cup avocado oil
S+P to taste
Instructions
Preheat the oven to 400 degrees and lay bacon out onto a tin foil lined sheet pan or wire rack baking pan. Bake for about 15-20 minutes until bacon is crispy. Transfer the bacon to a plate lined with paper towels and set aside.
While the bacon is cooking, make the candied maple pecans by heating a skillet with 1 Tbsp of butter over medium heat.
Place pecans and syrup in the skillet, stirring constantly for about 3-5 minutes. While the syrup thickens and is coating the pecans, sprinkle seasonings over the pecans.
Spread the mixture out onto a parchment paper and allow to cool completely (the syrup will continue to harden as they cool). Set aside.
To make the dressing, add sliced shallots and mashed garlic to the same pan with 1 tbsp oil. Sauté for a few minutes until the shallots are caramelized and softened. Stir in the maple syrup, apple cider vinegar and a dash of salt and pepper and let simmer for 30 seconds or so. Transfer mixture to a food processor and add dijon mustard, oil and seasonings and pulse until mixture is smooth and creamy.
To a large salad bowl, add the mixed greens and arugula along with apple slices, candied maple pecans, bacon (roughly chopped), blue cheese crumbles and pour in the vinaigrette and toss to combine.
Taste the salad and season with more salt and freshly cracked black pepper if needed. Serve immediately.
Notes
Making this salad for the holiday season and pushed for time? Find my go-to busy tips above with the header: EASY SALAD PREPARATION DURING THE BUSY HOLIDAY SEASON